watsonmil
-
Posts
1,397 -
Joined
-
Last visited
-
Days Won
4
Content Type
Profiles
Forums
Events
Store
Downloads
Gallery
Everything posted by watsonmil
-
Dear Stephen, I keep several different gauges of brass on hand, ... some new, some old. If you give me the measurements ( length, width ) ... I'll see what I can find you and sell you a few pieces at basically the cost of postage plus PayPal fees. Remember I live in Canada, ... so postage might be a little higher than what you would pay if I lived in the USA. You can email me privately at : watsonr@mts.net ... Ron Watson
-
George, More photos are a necessity ! As far as selling, ... right here on this forum is as good a place as any. ... Ron Watson
-
Dear Piers, He split the pictures into two threads because he's new to the forum. Perhaps we can prevail upon Brian to combine the two threads into one. It would make things a lot simpler. I also noted the nipple hole is on top rather than the side ( somewhat unusual ) and this is one of the reasons I reserve judgement and ask for more clarification in the form of photographs. Also note the lock itself is most unusual for a conversion, ... yet it appears to be a matchlock serpentine ??? ... Ron Watson
-
George, I assume these are more photos of the gun I just remarked on. It is as Barry states probably a conversion from matchlock to percussion, ... but will need more photos of the SIDE of the barrel opposite the nipple opening. Also photos of the head of the serpentine ( hammer ). It is an interesting gun and in particular the lock is rather unusual for a conversion. ... Ron Watson PS. I note Piers has replied, ... I would personally reserve judgement until I see the photographs requested above and in your other posting.
-
Dear George, A photograph of the complete gun ( side, top and bottom ) profile is required. Also if you remove the barrel from the stock ... there is probably a signature on the underside of the barrel. A photograph of this signature would go along way in answering your question as to origin ( school and age ). As far as the mon are concerned, ... I will leave that to others. Without these additional photographs identifying the gun is not possible. ... Ron Watson
-
Dear Brian, What is the trade name of the moldable plastic ? Also, ... I can probably source you some tiny brass nails. I'll check and see if my hardware store still has any ( the store has been run for nearly 80 years but is soon to close, ... the only hardware in Canada that I know of where you can walk in and buy horse shoe nails and sleigh runner bolts of all things ). If you PM me your postal address, ... I will try ( no promises ) and forward to you by mail. Needless to say I am extremely proud of your accomplishment. I have been at this sort of thing for well over 30 years and I still get a thrill out of a restoration well done by myself rather than contracting it out. ... Ron Watson
-
Dear Brian, HOT DAMN, ... you did an excellent restoration. Love the patina. Also when I see how carefully and well you got your metal to wood fit, I can only say well done yet again. Did you use a lead solder or silver solder where the join is. I am surmising silver solder. PM Ford, ... and see if he can give us some insight into patinating that area or better yet comment on the NMB. The only other thing I can suggest is to very carefully file away the silver solder where it has run up the trigger guard slightly until you get to solid brass. This would leave you with a miniscule join of silver. Now then do I notice a missing insert ( perhaps a Maple Leaf ) just behind the lock plate. That should be replaced. Make a rubbing of it and transfer this to some flat sheet brass and start cutting and filing. You've done one hell of a fine job of getting the lines of your trigger guard to look both artistic and correct. You should be suitably proud ! ... Ron Watson
-
MAKING a TANEGASHIMA DOUGANE ( STOCK RING )
watsonmil replied to watsonmil's topic in Tanegashima / Teppo / Hinawajū
Dear Brian, Congratulations on completing your trigger guard ( yuojintetsu ). Now you see why I caution the overuse of Japanese terminology when an English word is more precise and understandable for now. I look forward to seeing your photos. When silver soldering one should have as tight a fit as possible ( the solder will still penetrate ) and if possible solder from the side away from the viewer. This eliminates most of the tell tale join when patinating, ... BUT not all. You are right though it is the chemical reaction to the two lookalike but different metals that causes the grief. I would be interested to hear what Ford's thoughts or solutions are to this problem. Personally I try to disguise it with a slightly darker patina in that particular area. Hard to explain, but I imitate a natural ( as much as possible ) stain somewhat larger than the join area. The only other way of getting around this would be to cast the barrel band ( dougane ) which few of us have the expertise or equipment necessary. I wish Ford would join in here with his thoughts as I am but a clutz whereas he is an artist. On a slight tangent, ... I used to have 20/15 vision ( exceptional eyesight ) and although my distance vision is excellent I now need reading glasses which makes restoration work more difficult since so much of it is fine detail work. Also I appreciate your noting that the odd dint or slight gouge or scratch it expected on a 100 - 400 piece to give it the feeling of age, ... a real NO NO is leaving file marks. File marks MUST all be removed ( speaking of items other than swords here folks ). ... Ron Watson -
MAKING a TANEGASHIMA DOUGANE ( STOCK RING )
watsonmil replied to watsonmil's topic in Tanegashima / Teppo / Hinawajū
Dear Chris, Although we have had differing opinions on occasion, ... I have grown to appreciate the fact I cannot match you on your sword knowledge or many of our other members for that matter. What I especially respect you for however is your unwavering assistance and advice freely given. It is thru the sharing of knowledge ( and on occasion being corrected ) that I derive the greatest pleasure. as I believe you do. It is indeed sad that both the collectors I mentioned have/had amassed impressive collections ( with the occasional bad choice ) but failed to participate with others with the same interests. They simply hung their treasures in their Den and admired them without the least interest in their study or their history or their sharing with others ?? ... Ron Watson -
MAKING a TANEGASHIMA DOUGANE ( STOCK RING )
watsonmil replied to watsonmil's topic in Tanegashima / Teppo / Hinawajū
Dear Piers, This one took some time mostly because of the tiny chip missing from the stock lip just ahead of the fitted dougane. I didn't notice it before I started and although tiny, ... it created headaches when I wanted a perfect fit. Anyway, ... it turned out not bad. I ran across two American Matchlock collectors. One in particular has at least 25 matchlocks. He has not bothered to translate a single signature. He obviously has more money than the average collector by far, ... but I don't get the idea of simply accumulating without study ! I have known him for years but the other just passed away and his collection was held basically in secret. It is in the process of being liquidated. Sad really as he had a few rare pieces but no intention of sharing with others his knowledge or even communicating for the purpose of learning about what he had. ... Ron Watson -
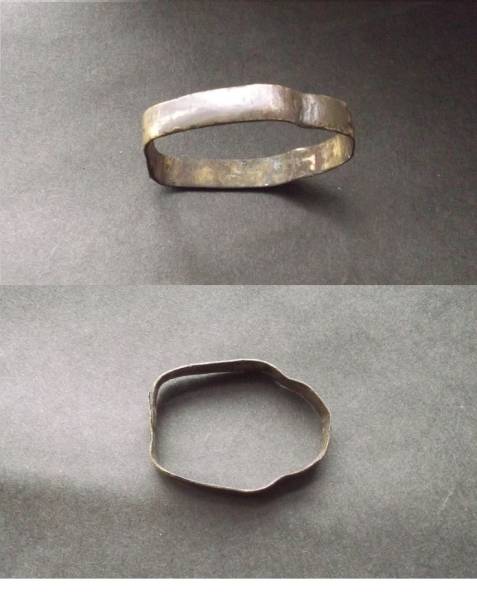
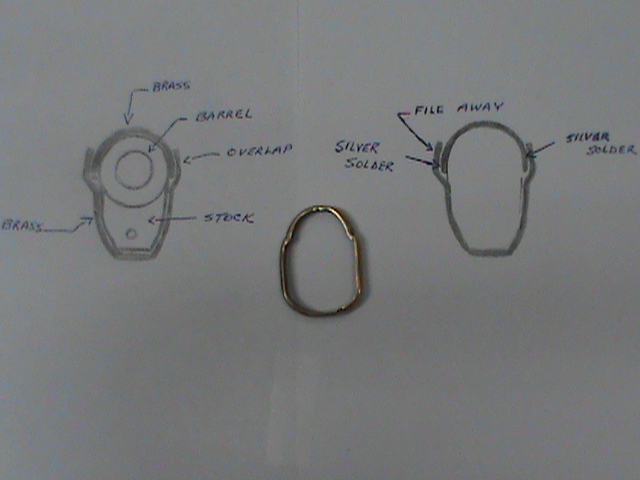
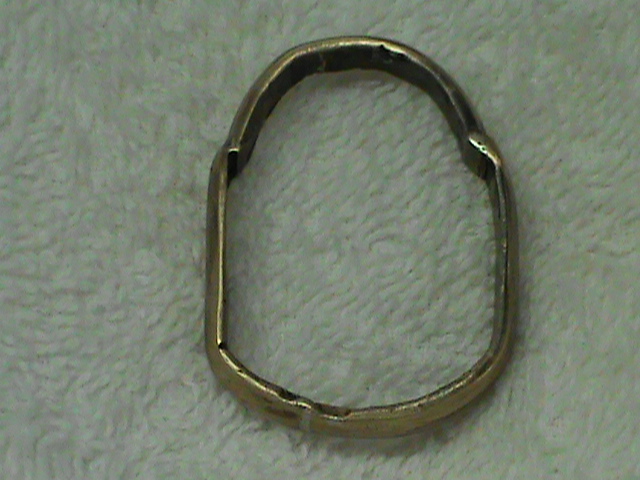
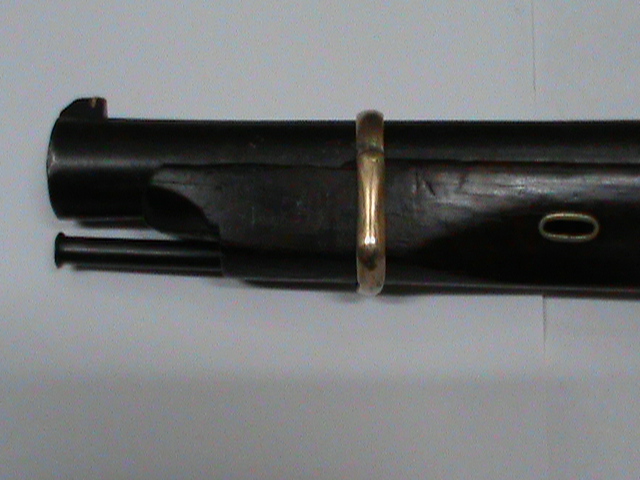
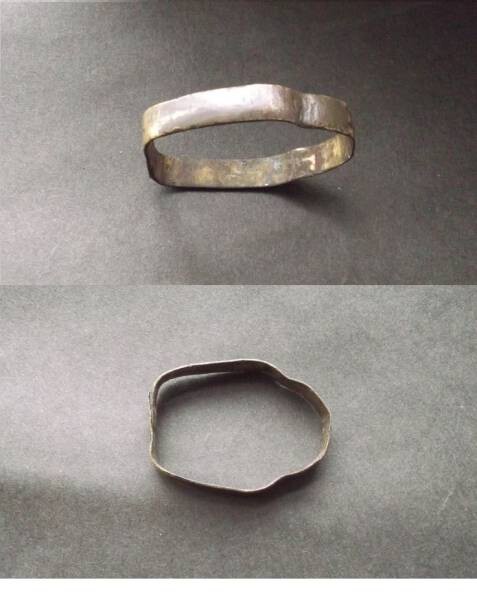
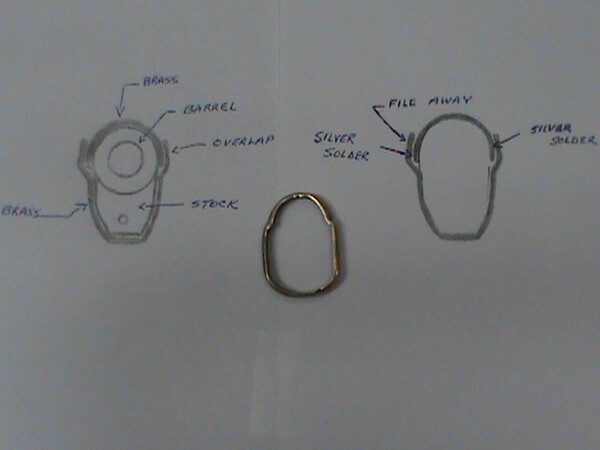
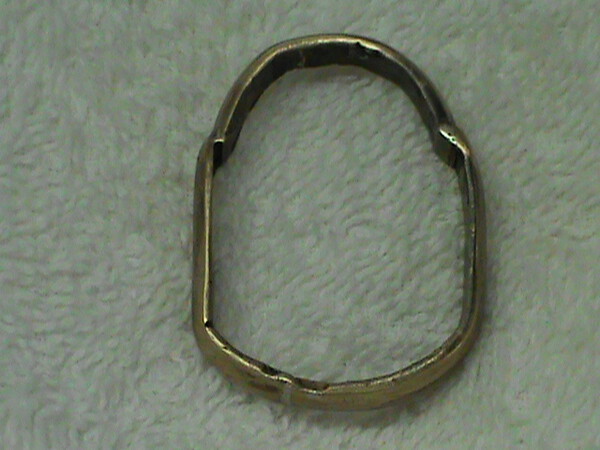
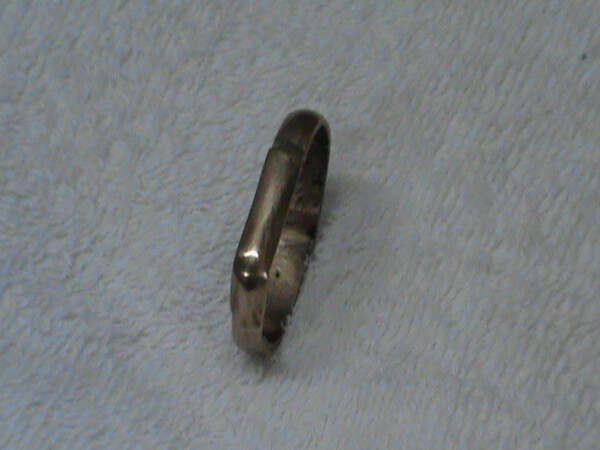
For those not familiar with the Japanese nomenclature of Matchlock parts ... the DOUGANE is the brass ( usually brass ) stock ring that is present on virtually all Japanese matchlocks at least the rear stock ring but occasionally also further up the stock nearer the muzzle. I will not spend too much time going into the fabrication of the rear stock ring as these can usually be fashioned by bending a correct shaped piece of brass stock around the wood stock and then silver soldering the ends where they meet under the stock. A couple of things to remember is : the brass that is available commercially is usually terribly hard and therefore requires annealing ( heating to a dull red with a propane torch and then immediately immersing in cold water ) to soften. Where each bend in the band goes the brass should also be scored on the inside using a triangular file deep enough to aid in the bending ( trial and error ). Once the two ends are joined by silver solder any final fitting can be accomplished using a flat file to get a nice snug brass to stock fit. Now then, ... the front barrel band ( dougane ) is somewhat more difficult as you are fitting the brass not only around the stock but also the barrel of your matchlock. The difficulty here lies in the slight stock ridge protruding on either side of the barrel. Since this forms a right angle to the barrel and therefore causing the brass to make a sharp slight perpendicular bend before bending vertically downward to continue around the outside of the stock it is difficult to get a nice snug metal to metal ( barrel ) to wood fit particularly if the dogane is rounded rather than flat. A thin flat dougane can often be bent to shape by hand ... see first photograph for a thin flat front dougane, BUT a dougane of greater thickness will be virtually impossible to fit by hand. This is the reason for this short instructional article. Most ( other than the thin flat dougane ) are made from a round brass stock ( rod ) ... quite often 1/4 inch ( 6mm ) or possibly 3/16 ( 5mm ) diameter which must be cut in half to make a half circle. This is accomplished by laying a slightly LONGER than required piece of round stock in your bench vise and allowing half to stick up above the vise jaws. Then using a hacksaw and using the top of the vise jaws to act as your guide ... you make your cut. When finished you should end up with the brass round stock cut nice and straight and the top half THE WIDTH of your saw blade smaller than the bottom half. The top half is the piece we make our stock ring from. Now, ... take the brass half circle you have made and at the center point bend ( remember to have annealed the brass ) it snugly around the portion of the barrel where the dogane is to fit ( some barrels are slightly tapered ) so this is important. Now allowing for a slight error in measuring ... mark ( using a pencil ) each side of the brass about where each side will come in contact with the stock lip. Use your hacksaw to make the cuts. You now have three pieces of brass half round stock. A top and two sides. Try fitting the top piece of the dougane to the barrel to see how much too long you have cut it and mark these points with a pencil. Set aside ... and fit each of the other halves and bend to go around the stock ( having left about 1/8 inch protruding above the stock lip ( this is why we always cut the brass slightly longer when preparing the half round from the original round rod ). Now hopefully as you bend around each piece of brass around the stock on it's final bend before the two halves meet at the bottom side of the stock you will have left enough brass that they are going to overlap slightly. The excess we will worry about later during the final fitting and before we solder these two ends together. Using two small C-Clamps join ( one side at a time ) to our rounded barrel piece of brass with the side pieces overlapping the rounded piece as in the drawings I have provided. This should then be silver soldered. Repeat with the other side. Once cooled ... we now have a single piece of brass and WITHOUT having silver soldered the bottom joint together, .... we try fitting to the matchlock, ... noting how much of the rounder piece must be filed away on each side ( on the inside ) to get a nice snug fit around the barrel butting up on the stock lip. File until this rounded piece of brass fits snugly around the barrel and just touches the stock lip Now we file the outside excess overlap away until it just nicely meets the sides of the rounded portion .... see drawings. Once I am fairly satisfied, I mark off the brass stock at the underside of the stock so that they butt up against one another. This can then be silver soldered together. There we now have our front dougane which of course will need a little more filing to get a perfect fit. Once you are satisfied the brass may be polished ... although a few tiny dints need not be removed as these will lend age to the dougane. The whole may then be patinated to the right colour. Remember, ... I should have mentioned this before you may have to gently use a dull chisel and hammer to get that nice fit at the lip section of the srock where barrel meets wood in the final fitting. The almost completed dogane I picture still needed a little fitting before perfect as shown in my last photograph of the finished dougane in place on the matchlock. Some may say, ... well doesn't the silver solder detract from the brass ?? The answer is no, ... not if you are careful as silver solder takes on the appearance of brass rather than a silver colour. These front dougane are the more difficult to make compared with the breach end dougane ... and others may have a different way of fashioning a replacement, ... but I assure you I've made several and putting things back to original condition is a most satisfying reward. I wish you luck and patience. As always any errors or omissions are mine alone. ... Ron Watson

-
Dear Henk-Jan, Congratulations AGAIN, ... should you wish to sell, ... I'd even pay the shipping plus PayPal fees ! Thank you for posting. ... Ron Watson
-
THE TANEGASHIMA BREACH PLUG ( BISEN ) ADDENUM
watsonmil replied to watsonmil's topic in Tanegashima / Teppo / Hinawajū
Dear Dan c, Since the die thread used in the forging of the barrel was HARD steel, ... and the Bizen was of soft steel, ... it would be only logical that the threads on the bizen were hand filed to match the threads of the male die. The male die was probably reused numerous times in other barrel making. See: in the first part of the addendum : " The female screw was made by forging; therefore the shape was tapered screw and the male screw was cut from a low grade steel bar, confirmed by their macro-structure. " ... Ron Watson -
Dear Jan, Here's another set from one of my swords, ... similar to Richard Stein's. ... Ron Watson


-
Dear All, First refer to past thread : viewtopic.php?f=87&t=19589&start=0 Some new ( to me new at least ) which confirms my theory that many of the Threads on the Tanegashima were FORGED rather than cut. Only the male thread ( bizen ) threads were cut by hand filing. Please see : https://www.jstage.jst.go.jp/article/te ... 6/_article. I quote : " The metallurgical macro- and micro-structure, and the residualstress of the Japanese matchlock gun, fabricated at the late Edo period, have been investigated with an optical microscope, an SEM, an EPMA and an X-ray residual stress meter for estimating the fabricating process and their materials. This gun was fabricated by Udonbari (in Japanese) process, which is similar to that of the Russell's method, tubes was created by the joining together opposite edges of a flat iron strip with an iron core bar. The joining line was wavy. Their residual stress was mainly compressive and the values were from 180 to 280 MPa in the longitudinal direction and from 240 to 380 MPa at the transverse direction. The gun was made of low carbon steel with equiaxed ferrite grains; their grain size was mainly 10 μm partly with 100 μm and exceptionally more than 1000 μm grains. Moreover, we find the special banded structure, consisted of fine ferrite grains bands and large ferrite grains bands. The firing part was fabricated by the joining of five parts for getting the L-shape hole. The female screw was made by forging; therefore the shape was tapered screw and the male screw was cut from a low grade steel bar, confirmed by their macro-structure. " ... Ron Watson
-
Dear Dan C, Supposedly these people sell gilding Brass : http://www.nbmmetals.com/c21000-gilding-brass.html I have had no experience with them however. ... Ron Watson
-
Dear Brian, I was hoping someone else would step in ( Ford perhaps ) and give an opinion on the Brass composition used in early Japan. It seems to me that it is very much like the brass currently available for today's metal worker. The brass as we buy it is usually fairly hard ( tempered ) and therefore somewhat difficult to bend without cracking. This can be corrected by annealing ... The way to soften brass is to heat it up until it glows ( careful not to over heat ), then quench it in cold water or some prefer to allow natural cooling. This makes the metal soft and much easier to work. NOTE: As you work brass it inherently becomes harder again and may need a repeat annealing. The 3/16 brass rod may need to be annealed once you have cut to the correct length for your trigger guard to bend with ease. The Japanese would have cut from solid and then filed, drilled, etc. to shape. There will be no forging in the pieces you must make to restore your gun's trigger guard. The oval or egg shaped piece on the one end of your trigger guard is a separate piece which was attached to the ROD section by drilling and soldering, ... NOT forged from the rod itself. ... Ron Watson
-
Dear Brian, Please see new thread : viewtopic.php?f=87&t=20181 ... Ron Watson
-
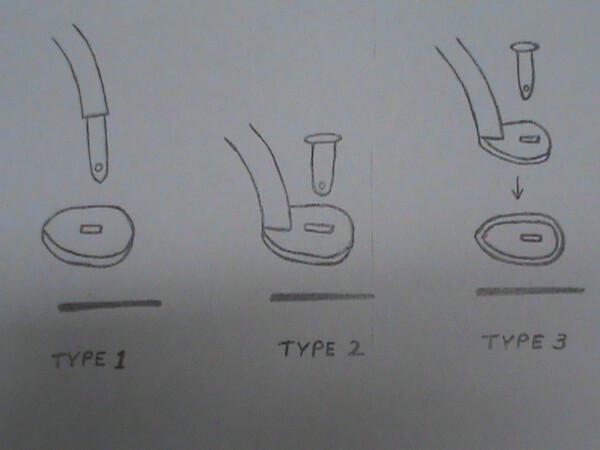
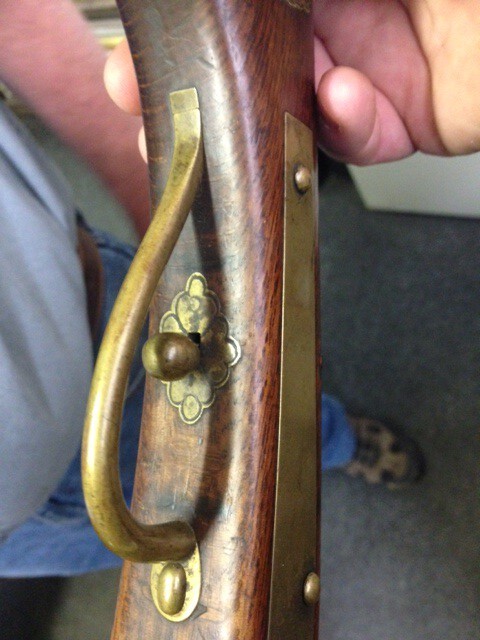
Finally the TYPE 3 TRIGGER GUARD WITH INLET BRASS CUP. This photo below also shows the perpendicular cross pin NOT PASSING thru the lock plate as opposed to the TYPE 1 pins. ... Ron Watson
-
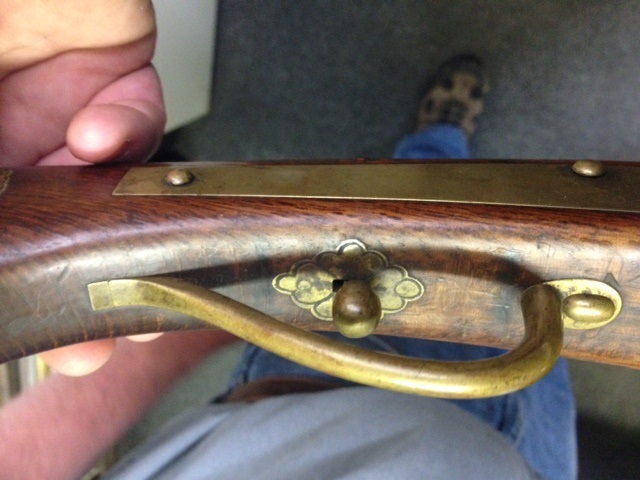
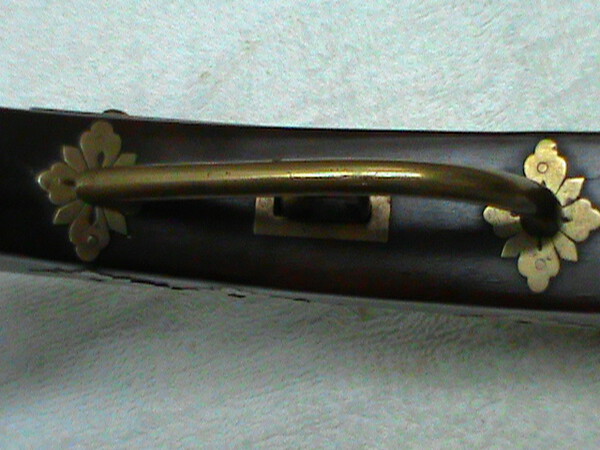
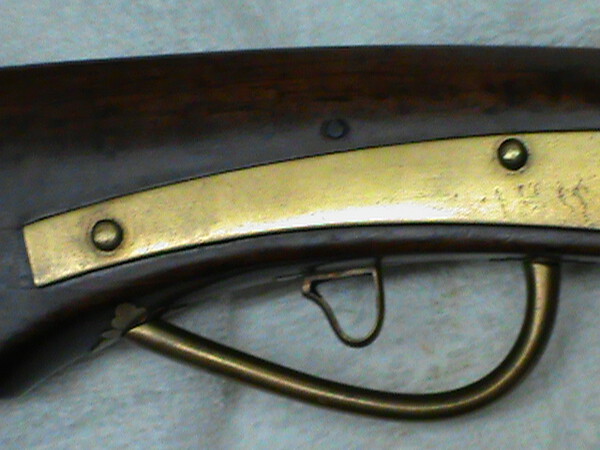
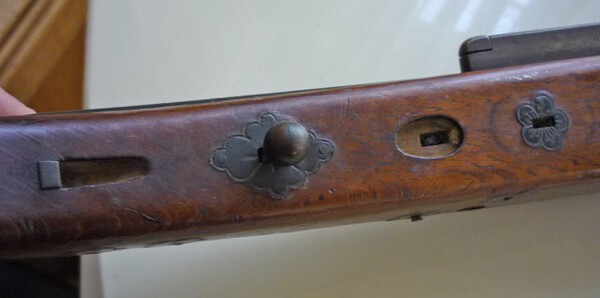
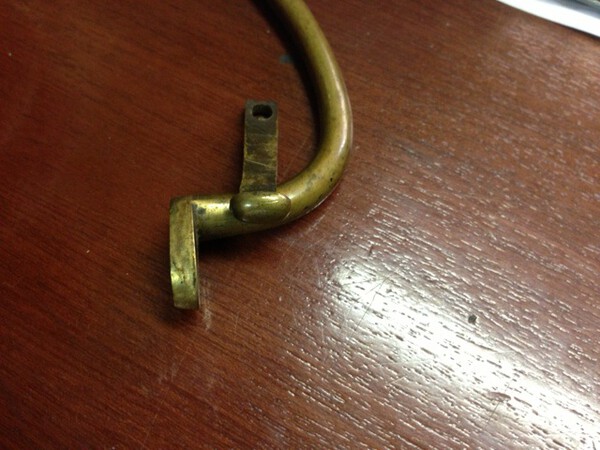
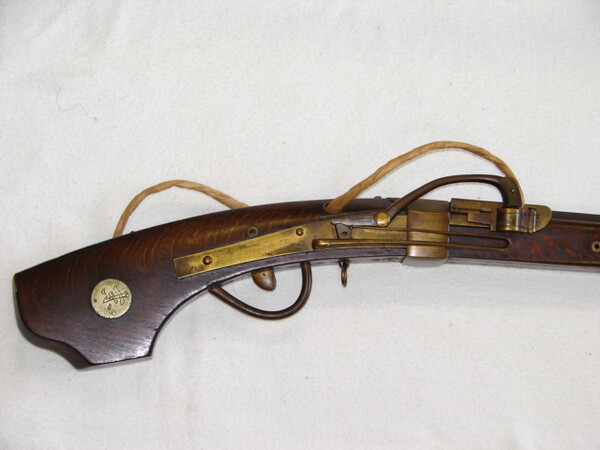
Dear All, I thought it wise to start a new thread, rather than deal with the subject of trigger guards in the post Brian initiated. Please see : viewtopic.php?f=87&t=20046 There are 3 basic ways that the trigger guard ( yuojintetsu ) attached to the stock ( see photograph below illustrating the 3 ways ). Note I used a line drawing as this will eliminate skipping from one photograph to another. Type 1 is by far the most common way of attaching the trigger guard. A thin brass plate ( often in a geometric or flower shape ) is inletted into the stock and has a small rectangular opening thru which the ends of the trigger guard ( a trigger guard has two ends ) passes and on into the stock and is held in place by a brass pin passing perpendicular thru the stock ( often this pin also passes thru the lock plate ). Probably 90 % of all trigger guards ( if the gun has a trigger guard ) are attached in this manner. These perpendicular brass pins also help secure the lock plate to the wooden stock. Type 2 is a less common but also seen PARTICULARILY on early Edo firearms for some reason ( personal observation ). In this case an oval or egg shaped inlet is cut into the stock ( as in Brian's latest acquisition ). The trigger guard on ONE end only ( the front end ) has as an integral part an egg shaped piece of brass that fits snugly into the inlet oval in the stock. This has a small rectangular opening thru which a pin passes to hold the trigger guard in place and thru which passes a perpendicular brass pin again thru the stock. For some reason this pin rarely passes thru the lock plate but rather is a separate pin found just below the lock plate. Note in order to get a nice snug fit the egg or oval shaped piece of the trigger guard is usually slightly bevelled. This is an old trick used by gunsmiths the world over for getting a perfect metal to wood fit. The opposite end of the trigger guard usually fits into a slot inlet into the stock and is usually held secure by slipping behind or sometimes into a separate brass locking ( for lack of a better word ) piece fitted into the inlet to accept the end of the trigger guard. See photograph of Brian's acquaintances gun ( photographs A3297 and A3298 ). Type 3 is even less common but also seen PARTICULARILY on early Edo firearms or at least firearms of the highest quality ( again a personal observation ). Here the stock has been inlet in an oval or egg shape BUT a brass liner has been added as additional protection against splitting of the stock. Again the trigger guard has the oval or egg shaped piece integral and this fits snugly into the brass lined cup ( for lack of a better word ) and is again held in place by a pin and cross pin as described in the Type 2 arrangement. I actually went to the trouble of making one of these brass liners and was going to describe its manufacture in this article, ... but rather than bore you all to death have decided not to include a description and all the accompanying photos as it is not pertinent to this article and it is so rarely seen that few if any of you will need to make one. I can always do an addendum to this article should the interest arise. As always any errors or omissions and opinions are mine alone. ... Ron Watson
-
Dear Sir, For some reason I cannot locate the photo of this particular tsuba on your site. Please post a link. Thanks. ... Ron Watson
-
Dear Brian, I caution you, ... your trigger guard does not necessarily attach as per the way your friends trigger guard attaches ( forward part of trigger guard in the oval section ), although it may and probably does. I will send some photos this weekend to clarify what I mean. It is quite possible it does but there were two separate ways of utilizing that oval or egg shaped opening ... you can be the judge of how you want to attach. It will not hurt to show our other readers these two methods anyway. The more I look at the oval on your gun the more I think it was utilized the way your friends trigger guard is made. In the meantime locate some 5 mm brass rod. ... Ron Watson
-
Dear Henk-Jan, I rather like that, ... at $ 22.50 you got a bargain too ! ... Ron Watson
-
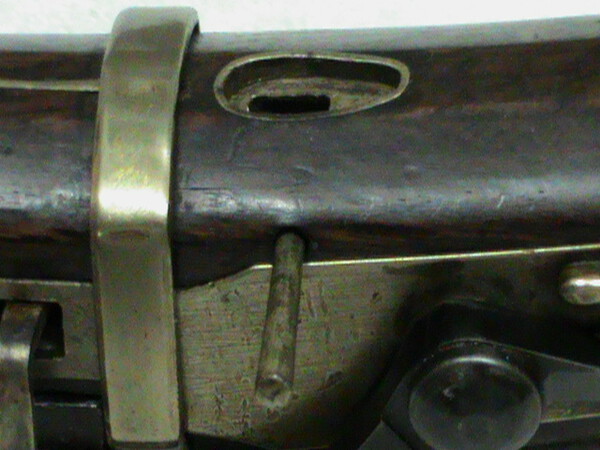
Dear Brian, The swamped barrel with the silver insert is identical to my example ... see my photograph. I should have mentioned, ... the ramrod is almost certainly a replacement. Although some Tanegashima had iron ramrods ( the Yonezawa in particular ) it was something of a aberrant to find it otherwise. Yours should be wooden ( an oak preferably ). Regarding the obstruction at the bottom of the barrel, ... have you thought about using a gun worm to pull the obstruction up and out ( if wad and powder ) or a wood screw on the end of a rod to force into and pull out a musket ball if one of these inadvertently got dropped down the barrel ? I have had occasion to use both with success. You do as you please with the bizen. All I was trying to convey ( for everyone's reading ) was that it is not really necessary and may cause damage. Good luck, ... and I think you bought yourself a fine example. By the way the opening just ahead of the sort of oval inletting on the bottom of your gun was for the attachment of a brass ring often seen on Japanese Matchlocks for the attachment of any type of accoutrement ( perhaps a vent pick ). See photograph attached. In about a week my grandson will be out ( if no one jumps in with a photo in the meantime ) of the inlet oval area which held one end of the trigger guard ( Yuojintetsu ... for those whom insist on obscure Japanese terminology ) and a complete photo of the style of trigger guard. You should easily be able to fashion a decent facsimile from a piece of brass rod usually 3/16 ( about 5mm ) diameter. The difficult part in your case is that the oval inlet contained a brass liner ... not so easy to duplicate but NOT IMPOSSIBLE. I can do an article on how to make one or instruct you by PM if necessary. I am at your disposal ... not a good word ( probably a lot of readers would like to dispose of me ). ... Ron Watson
-
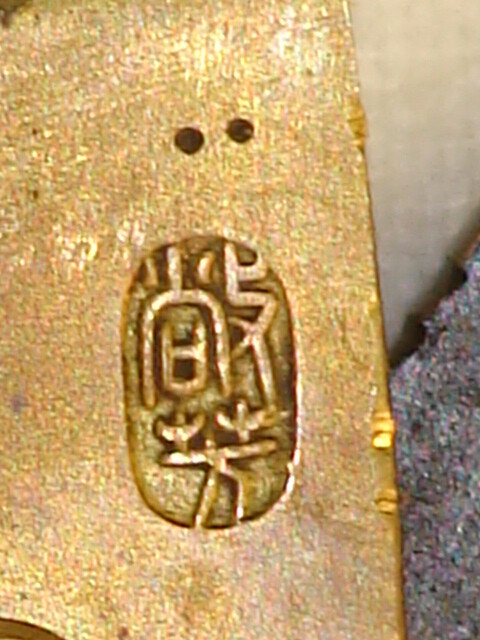
Dear Brian, Your gun and mine seem to share from what I see so far only the family name Kubei or Kyubei. It is my contention that due to the similarities in signatures ( too many coincidences ) that they probably were made by father and son. Your gun has enough of the same traits as SAKAI makers that it would be most likely be considered a Sakai example. Examples of the traits I see : The shape of the butt, ... the large dougane encircling the breach, ... the top pinned lock, ... the round protrusion on top of the main spring ( Oh, I'm sure the Japanese have some special name for this feature but I do not know it nor care to, but perhaps Piers does and for those stuck on Japanese terms can provide it ) ... the Serpentine ( or as you are referring to it as a frizzen ... in Japanese the term is hibasami ) although rarely a definitive clue is identical to the sakai guns .... the rear sight again appears on sakai guns ( as well as other areas however ) ... the revolving sear feature that you describe I have only noted on Sakai guns. As the serpentine is cocked the bottom of the serpentine engages the botton protrusion forcing the sear to revolve out to engage the top of the serpentine arm. The one thing that Sakai guns generally have as an identifying feature is a poppy-shaped muzzle ( a photo of the muzzle of your gun would be helpful ). Now having said that about the muzzles being poppy-shaped this AGAIN is not an absolute as many Sakai guns do not have the poppy-shaped muzzle. Please refer to Sugawa's book The Japanese Matchlock for an example close to your gun in many respects ... page 16 top example. Also note he says, " No. 1 is a perfect example of the Sakai style ( bearing the Kunitomo name ). " As a matter of fact : Kunitomo Kyubei Yasumine. The lock of your gun bears a Kakihan, and to me at least this is often a sign of quality. Only one of my Tanegashima bears a Kakihan on the lock. Photo of mine attached. This was kindly translated by Morita san ... perhaps he can/will do the same for yours. Mine says : Hiroyoshi or Takayoshi. The serpentine on your gun is of brass, and although it can be bent slightly to re-align it properly, ... one must be very careful as it can snap. Since you have a resident gunsmith where you work, ... I would ask him to do this as he may or may not want to apply heat. I would also caution as I have in previous threads that buggering around with the bizen is not necessary and may well cause damage. I should also add that assigning Tanegashima ( Japanese Matchlocks ) is not only difficult at times ( " many times ", would be better put ), ... but given the transient behaviour of the gunsmiths of the later Edo period, we often find two completely different styles incorporated into one gun ... making a definitive assignment as to what is a Winchester and what is a Remington impossible. Your gun appears to be nearly pure Sakai, ... and mine to me at least appears to be pure Kunitomo and yet the guns are related by maker ... of that there is little doubt. I would say that the quality and style of the barrel decoration is original and not a later addition. All in all from what I see a truly wonderful example of the Japanese Matchlock. You should be most pleased. I look forward to seeing photos of the complete gun ( but especially the MUZZLE ). ... Ron Watson