
watsonmil
-
Posts
1,406 -
Joined
-
Last visited
-
Days Won
4
Content Type
Profiles
Forums
Events
Store
Downloads
Gallery
Everything posted by watsonmil
-
Dear Arnold, The same as today .... MONEY :D ! ... Anonymouse Ron
-
IMPORTANT FURTHER RESEARCH INTO TANEGASHIMA PISTOL
watsonmil replied to watsonmil's topic in Tanegashima / Teppo / Hinawajū
Dear Brian, There is no harm in trying. I have sent an e-mail to the seller. Hopefully we will get a response .... for the kind of money he seems to be looking for ... I should hope so ! ... Ron Watson -
IMPORTANT FURTHER RESEARCH INTO TANEGASHIMA PISTOL
watsonmil replied to watsonmil's topic in Tanegashima / Teppo / Hinawajū
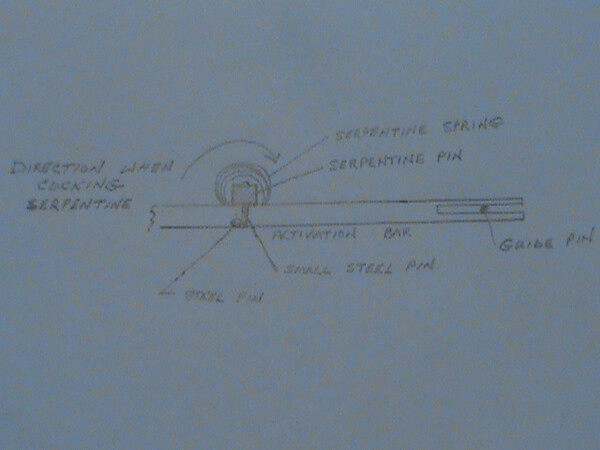
Dear Brian, No, ... if there is one thing I'd bet the " family jewels " on ( taking into consideration I don't use them much anymore ) is that according to the internal sliding rod guides ( note I said guides and not guide ) which narrows down the possibilities of what the brass pan cover arm ( rod ) had to fasten to ONE, ... and the push rod's position next to the serpentine pin, ... I am 99 44/100 percent positive I have it all correct. I used the same rod as previously used when I had incorrectly assumed it was for a pin storage compartment and soldered on the brass push lever. The only other modification I had to do to the rod was to drill a tiny hole and insert a steel pin for the square edge of the serpentine pin to catch and move. This logic seems simple now, but when you are working from logic rather than photographs trying to understand someone else's mechanical ingenuity who has been dead for nearly 400 years it is not so simple. The later pistol also having an automatic pan cover opener I am certain operated on a different system ( later improvement ) ... and I can PROVE this. Look at the photograph from Sawada's book and you see a BRASS LEVER the same as I reconstructed ( Munetoshi's design ). Now on the later pistol, ... do we see a brass lever ... NO, ... but we do see a TIT on the pan cover which goes into the opening on the side of the pistol replacing the BRASS LEVER of the earlier system's design. I would love to see how the gunsmith got the later version to operate but unless someone can convince the present owner to disassemble the lock ... we shall never know, and my brain already hurts enough from reconstructing Munetoshi's design to not delve into solving the other design. ... Ron Watson -
website japaneseweapons.net
watsonmil replied to Peter Bleed's topic in Tanegashima / Teppo / Hinawajū
Dear Eric, I had at one time discussed co-authoring a book on the Tanegashima with Piers. Given the high cost of printing and the VERY limited interest such a book would get ... kind of put us/me off on following it up. Publishing a book is a very expensive proposition and I at least can ill afford to lose a wad of money. The only alternative I have bantered around is something a friend who specializes in Grenades ( also of limited collector interest ) put together some years ago and that was to write the book and have the necessary photographs and text printed by a commercial printer on decent stock but with 3 holes punched with the intent of allowing the buyer to place the pages in a three ring binder. It would not be pretty, ... but to me at least it would be an economical way of disseminating the knowledge before one or the other of us are too old or worse dead. This I have not discussed with Piers. We had bantered about asking Ian ( although we never approached him ) to contribute. By doing a book in this fashion one need only print up a limited number until sold out and then print up another batch of pages. It would even work out to add a supplement as new information becomes available. To do this project myself would be very difficult as I have no mastery of either spoken or written Japanese and I am not so sure that I am even scholarly enough on the subject to tackle it. In the meantime I will try and write an article now and then for the NMB and give opinions for what they are worth. It is better than not doing anything ... even though I sometimes come across as a crusty old man. ... Ron Watson -
Translation request on Arisaka Type 30 Carbine
watsonmil replied to lkgmadmax's topic in Translation Assistance
Dear David, I believe the meaning is : Type 38 - Model of 1905, ... found in Long, Short and Carbine configurations. It is somewhat unusual to find the Chrysanthemum in place rather than either ground off or disfigured if captured during WWII. The Type 30 was used by front-line Japanese forces in the Russo-Japanese War. Although it was a major improvement over the Type 22 rifle (also known as “Murata”), it had some reliability and safety issues. Based on combat experience, an improved version, the Type 38 rifle, was introduced in 1905, although not all units received the new version and, as a result, a mixture of models was retained by the Japanese Army into World War I and even later into World War II. Part of the above information courtesy of Wikipedia. ... Ron Watson -
website japaneseweapons.net
watsonmil replied to Peter Bleed's topic in Tanegashima / Teppo / Hinawajū
Dear Eric, Yes indeed I was rather rude and it really did not hurt me in the least to re-read Shigeo Sugawa's book. Is his English book so full of MAJOR errors, ... I would have to say no. Could he have or could his translator/interpreter have done a better job ... yes. I don't think he meant his book to be a scholarly work but rather a primer or introductory book on a subject little appreciated or understood in the West ( and even less so in my opinion in Japan ). Perhaps I am somewhat biased in my opinion of Sugawa in that I expected at least a cursory reply to my snail mail letters of some years ago, .... but even with my bias, I would find it difficult to rate his book as scholarly. It is an excellent primer no more no less. Eric, ... I accept that my reply to your queries was on a whole indefensible and I extend my apology. I must however in defense say that I took your post as a bit of a personal attack rather than just genuinely questioning my reasoning. It is still does not excuse my rudeness and for that I am sorry. ... Ron Watson -
website japaneseweapons.net
watsonmil replied to Peter Bleed's topic in Tanegashima / Teppo / Hinawajū
Dear Eric, Ah, ... nitpicking are we ? You are getting as bad as the Nihonto purists. In my posting I actually extend to Shigeo Sugawa a great deal of credit for having published in English. " Some of his writing has inaccuracies. However having said that, ... we English speaking students would be at a great disadvantage without his book. " Along with some of the inaccuracies pointed out by Piers ... ( Piers, .. I along with you have been silly enough to bend to Eric's post ) and re-read Sugawa's book. If we are going to worry about DETAIL ... I would like to point out that his description of loading a Tanegashima or practically ANY muzzle Loading firearm requires the use of a wad between the powder and ball, ... or at the very least a PATCHED ball. In the case of the Tanegashima for the first shot at least a wad is ALSO rammed down the barrel AFTER the ball to hold the bloody ball from rolling out the barrel ... ( smooth bore remember ). This last wad is usually not necessary after the first shot as the fouling inside the barrel provides enough friction to hold the ball in place. He makes no mention of this and believe me it is IMPORTANT. Quickly looking at his on-line site, ... I notice he writes : " The barrels of Japanese matchlocks usually are seated very deeply in the gun stocks and are held securely by three or four bamboo pins. " He fails to mention that a goodly number of Tanegashima have brass stock rings ( dougane ) rather than pins holding the barrel to stock. Also while we are on the subject of his web site, ... his photographs of Seki guns and Mino guns portray the exact same firearms. Granted they come from the same area, but it is never the less confusing to those without a knowledge of Japanese localities. Yes, ... I am also guilty of nitpicking, as I am guilty of making an error in my own writing on ANY subject. NOW, ... having wasted a goodly part of my morning catering to silliness, ... I base my criticism or rather statement that Sugawa to ME is more of a collector rather than a scholar in the fact that I at least have found him un-approachable. This is not the way of a scholar. I have written him BOTH in English and Japanese on more than one occasion and finally gave up as no response was forthcoming. In contrast, ... I have written to the curator of the Tokugawa Museum, and also the Curator of Japanese Arms at ... I believe it was the Tokyo National Museum and in both cases I received lengthy replies and my observations were noted and acknowledged. These to me are the actions of scholars. There we go, ... I hope I have answered your objections/disagreements Eric . ... Ron Watson -
website japaneseweapons.net
watsonmil replied to Peter Bleed's topic in Tanegashima / Teppo / Hinawajū
Dear Peter, Shigeo Sugawa ... the author or webmaster or whatever the correct term is, is well known as the only Author to publish a book on the Japanese Matchlock in English. He is basically a collector, ... and not really a scholar ( he might have a different opinion of himself ). I personally have found him un-approachable. Some of his writing has inaccuracies. However having said that, ... we English speaking students would be at a great disadvantage without his book. The only real Japanese authority ( scholar ) regarding the Tanegashima is Sawada Taira with his book Nihon no Furuju ( in Japanese ). It would be nice to have an English translation, ... but none so far and I am not even positive he is still alive. By the way he is also sometimes in error which I proved in restoring the Automatic Pan Opener Pistol by Munetoshi. I am hoping one day to obtain a copy of his work even if it is in Japanese, ... but being difficult to find I've had little luck. DO YOU HEAR ME PIERS DOWDING ?? ... Ron Watson -
Dear Mark, I'm not sure if I'm the Ron you refer to, ... but indeed I am looking for a Waterwheel tsuba to compliment some lovely fittings on a sword I own. I would prefer something at least 75 mm in diameter and 80 mm would really turn my crank. It would be nice to have some waves involved as well ( gold tipped ) ... might as well wish for the moon. ... Ron Watson EDIT : On reading the whole thread I can see, ... I'm not the Ron referred to, .... my apologies Mark et al.
-
BING-GO Brian, ... a perfect answer. Yes occasionally one sees a solid brass pin ( as with my automatic pan opener pistol ), ... but this is generally the exception rather than the rule ..... ... Ron Watson
-
Dear Brian, Please photograph as you go along for an " How to article ". Even though I prefer using all hand tools ... doesn't mean everyone does. I hopefully have a photo coming from a friend showing the reverse side of an Ama-ooi. Whether it is one like yours I do not know. There are a few varieties ESPECIALLY on how they attach. I will post photo when it arrives. I guess I could take one of mine off, ... but having fitted a couple, and having a couple nice and tight and original, ... I am hesitant. ... Ron Watson
-
Book wanted or more specifically an article.
watsonmil replied to watsonmil's topic in General Nihonto Related Discussion
BUMP. Sorry about that but it was only up for a few hours. ... Ron Watson -
By chance does any member of the NMB happen to own a copy of this book. : The title is "Edo ni Asobu" 江戸に遊ぶ The English pronunciation is I believe : Rokusho , volume # 19 . There is a pipe ( kiseru ) pictured in this book that I would like to research. Please PM me at my private e-mail address : watsonr@mts.net if you can help. Thanks, ... Ron Watson
-
Assembling a kura saddle tree, how to tie together
watsonmil replied to Urushisuji's topic in Katchu
Please Sign all posts with at least a first name and initial. Here you go : See: Scroll down a bit for pictures of saddle. viewtopic.php?f=9&t=10751&st=0&sk=t&sd=a&hilit=saddle+parts&start=15 ... Ron Watson -
IMPORTANT FURTHER RESEARCH INTO TANEGASHIMA PISTOL
watsonmil replied to watsonmil's topic in Tanegashima / Teppo / Hinawajū
Dear Brian, Thank you for bringing yet another example to our attention, ... although employing a somewhat different mechanism for opening the pan cover it accomplishes the same task. This seems to be a quite a bit later version of an automatic pan cover opener, ... and to me at least on casual inspection ( not having it in hand to examine its mechanism ), ... it would appear to be somewhat of an improvement over Munetoshi's automatic pan cover opening mechanism. It is unfortunate that the pistol is mumei ( unsigned ). Sadly the shop who have the pistol have apparently done no research and there is little point in me writing them as my experience with the Japanese dealers and Tanegashima research has been dismal to put it mildly. I believe from what I can translate they are looking for in excess of $ 10,000.00 US for it. Another very rare example which I would love to research given the opportunity. The description given by the dealer seems to ( rough translation ) indicate that the gun was left unsigned to avoid repercussions from the Shogunate because of firearm restrictions on pistols. I have not found any decrees outlawing the production of pistols during the Edo Period. Perhaps someone knows of some particular decree, ... but I have been unable to find one. There were decrees on the number of guns produced each year however, ... so given the penchant for having a law for practically everything in Edo Japan ( and things have changed little in modern times ), it may be true. What is not true is Noel Perrin's silliness ( see Giving Up the Gun , Noel Perrin ) in suggesting Japan gave up the gun during Edo times. In truth during a nearly 250 year period of peace with no danger of Foreign Invasion, ... the sword was a much more convenient way of settling disputes as ALL Samurai carried swords and few if any carried firearms on a daily basis and pistols in particular were far too expensive to carry. In truth at the end of the Edo period a full 200 Gunsmiths were still working ... quite a far cry from forgetting the gun in favour or the sword as Perrin would have us believe. In FACT at least one Gunsmith was working during the period 1870 - 1896. I have one of his guns. His name was Rikizo Yoshida and by the inscription on the silver medallion on the stock, ... I believe I have the very last gun he produced. ... Ron Watson -
How to Make : Tanegashima Pan Cover Hollow Pin
watsonmil replied to watsonmil's topic in Tanegashima / Teppo / Hinawajū
Dear Brian, Yes, ... thank you for noticing that originals are made from rolled brass . If at all possible I work with hand tools or at least as far as I can when re-creating parts. You can buy different sizes of brass tubing from " Model Shops ", ... but the finished product does not look hand made and therefore not as the original. It is important when restoring to use the same type tools ( as much as reasonable ) that the original maker used, as it gives one an understanding of how things were done. Much like when you look at Ford Hallam's work, ... pretty much the tools and techniques that the old tsuba makers used are employed in his work. In this case to be truly honest, ... I should have hammered out the head section rather than use a brass screw, ... but this pin is not terribly valuable ( worth the extra time ) nor is my shortcut ever going to be noticed. Restoration can sometimes be a balancing act . ... Ron Watson -
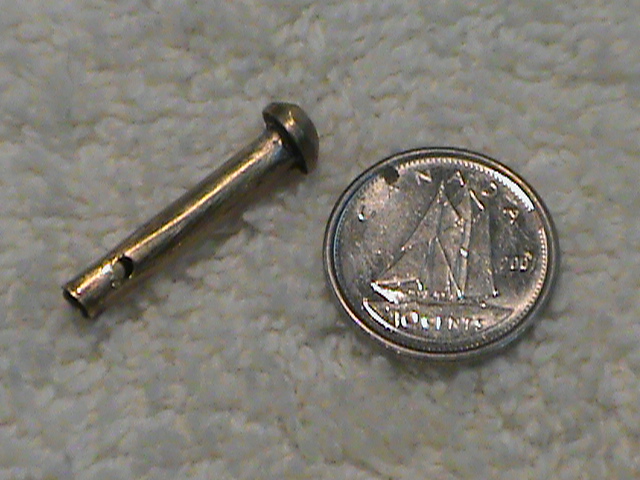
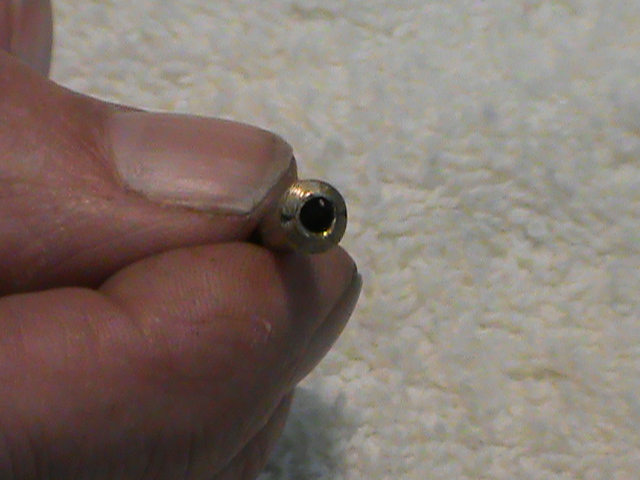
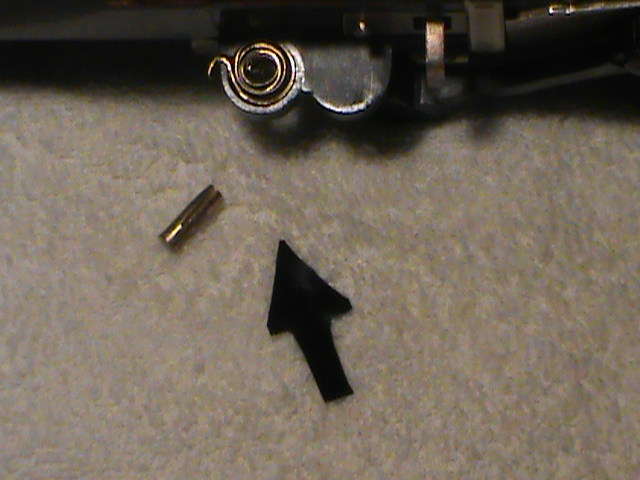
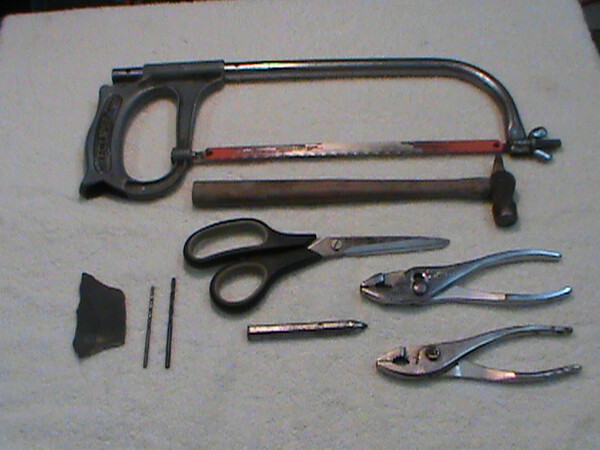
Over the years I have carried out innumerable antique firearm restorations. Often one of the most challenging can be repairing or replacing missing parts on the Tanegashima. Since I haven't bored you all for awhile, ... I thought I might ( although a few may find this helpful ). Quite often a Tanegashima will be absolutely complete but for one little item. The brass mekugi hibuta ana ( hollow pin that fastens the pan cover ( hibuta ) to the pan tray ( hizara ) will have gone missing and be replaced with a solid brass pin or as I once seen a cotter key ! Now then this little hollow pin looks simple but is a puzzle to make . Well lets make one : 1. Gather the necessary tools, ... a small hammer, a good pair of scissors, a hack saw, a center punch, two pair of pliers, fine emery paper ( crocus cloth ), a 9/64 bit ( metric number 68 ), a 7/64 bit ( metric number 75 ) and of course an electric drill and access to a vise and it helps to have a small band sander. 2. Material required, ... a round headed BRASS woodscrew or machine screw ( not brass plated steel ) one inch long ( 25 mm ) .... bloody metric ! .... small amount of sheet brass about 26 -24 gauge ( wall thickness of a .22 shell casing ), ... a little solder, flux, propane torch. Ok, ... here we go: Cut your sheet brass 7/16 inch wide ( 11 mm ) ... slightly wider will not hurt .... by 1 inch long ( 25 mm ). Now take the 7/64 bit the plain end and lay it along the middle of the piece of sheet brass. Using a pair of pliers squeeze the sheet brass around the drill bit working slowly until you have formed a small brass tube. If you have a little excess brass simply tuck it under, ... but if you've measured exactly the two sides should just nicely butt up to one another. Next take your round headed BRASS wood screw and tighten it into the vise head pointing up. Now if it is a slotted screw take your small hammer and carefully peen with the hammer all around and on top until you've completely closed the slot ( do not flatten the top of the screw too much ) Once you are satisfied, ... take your center punch and mark the dead center of the top of the screw ( to accept your drill bit which comes next ). Using the 7/64 bit drill a hole straight down from the top until you are nicely thru the head part of the screw ( make sure you go deep enough however ). Now using the hole you have just drilled take the 9/64 bit and drill to make the hole larger and just as deep. Loosen the vise and raise the screw just enough that you can lay your hacksaw blade flat against the vise. Tighten the vise and cut the head from the rest of the screw ( be careful not to lose the head ). Now clean the hole up a bit using emery paper and/or your 9/64 bit. You should now be able to insert your little brass tube into the head until it protrudes perhaps a mm or two thru the top. It will be a snug fit. Now apply a tiny bit of flux on the underside around where the tube and head meet. Heat with your propane torch and apply a miniscule amount of solder. Allow to cool, ... then insert your 7/16 bit plain end up until it comes even with the top of your screw head NOT the top of that mm or two tube above the head ! Insert in the vise with the head resting on top of the vise. Now take your center punch and slightly spread the mm or two of tube. You can now peen with your hammer this mm or two flat around the top of your head. If done right it will hardly be noticeable and most will be removed when touched up on the belt sander or grinding wheel. Since about 90 % original pins have a head that is exactly 1/4 inch ( 6.35 mm ) you can now use your belt sander or grinding wheel to round the sides of the screw head to this diameter. Also I have noted upon examining dozens of tanegashima that the hole thru the pan cover and pan tray are usually 9/64 inch ( 3.57 mm ), ... so one size fits all .... BUT NOT QUITE !! There are a few whose pin hole is larger and in these instances you can follow the same directions that I have given except that you will have to adjust the bit diameter to suit your gun and also the amount of sheet brass to make your hollow pin shaft. Now after inserting your new pin, ... mark off where it protrudes thru the bottom of the pan cover, take out the pin .... and drill a 1/16 inch hole ( Metric bit number 52 I think ). This is for a tiny piece of wire to hold the pin from being lost again. Below this small hole you can use your hacksaw to cut off any extra pin length not needed. Clean up your pin using fine emery cloth ( crocus cloth is best ) and patinate to desired colour. I have assembled a few photographs as a picture is worth a thousand words. As I find the time, I can if there is interest go into other areas of making missing or broken parts. Its up to the members to decide. ... Ron Watson
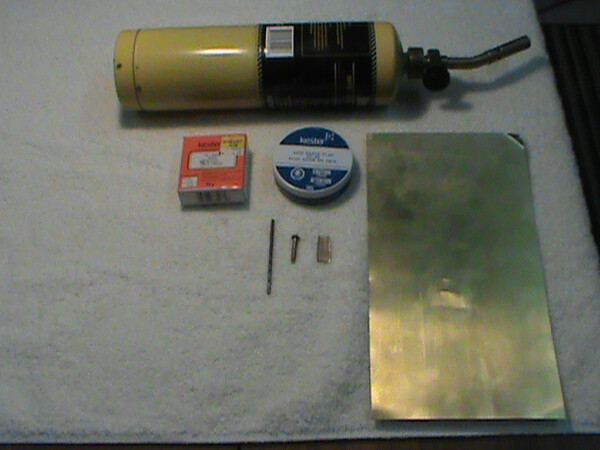
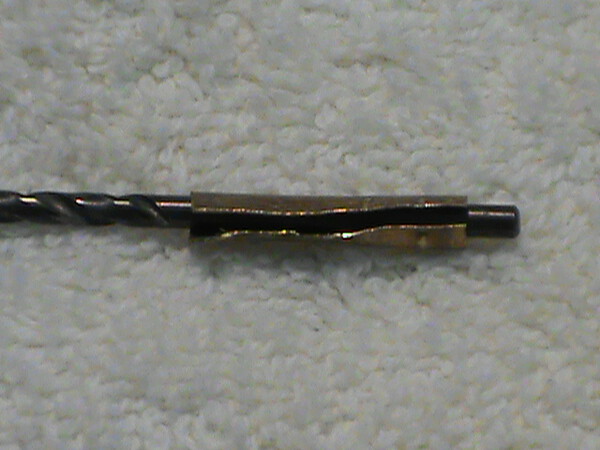
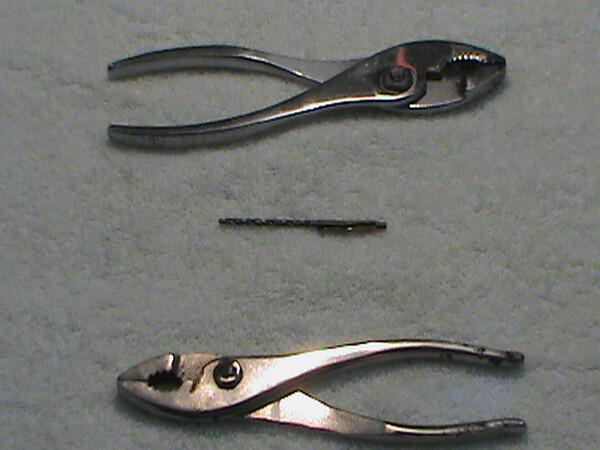

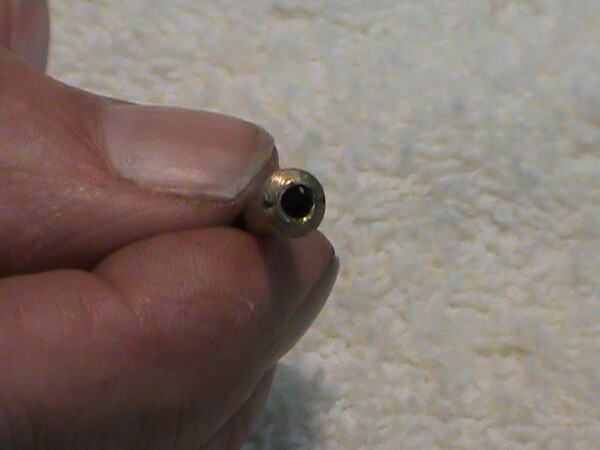
-
Dear Justin, Although not a really clear photograph it would appear to be a superlative job in my opinion. I cannot claim to be an expert on inducing or copying patination. Perhaps Ford Hallam will include a chapter in the series of books he is planning. Now that would be a treat. ... Ron Watson
-
Dear Sir, Anatti or Atti is better than Aunty, ... Antti ! ... Ron Watson
-
Dear Antti, I'm with Ford, and Chris on this one, ... I find the simplicity very attractive. I've always preferred my women to be without makeup, ... so I do not find overly done up flashy tsuba terribly appealing. It is all a matter of taste. I would happily own such an example and display it. Thanks for posting. ... Ron Watson
-
Dear Brian, Nothing about restoring a Tanegashima is easy, ... although it may at first look easy ! You are doing fine. Yes, ... Piers is correct about the soot. Now once you have the ama-ooi made, ... the patination requires some experimentation. I like to use the pieces of scrap brass left over from my restoration to get just the right colour. I use what is called : Black Patina for Lead Solder ( available thru stained glass shops ). It works well on brass and if you screw up and want to remove it, ... a light rubbing with fine emery cloth ( crocus cloth ) or extra fine steel wool does the trick. You can try everything from dipping or applying by cloth ( wear rubber gloves ) straight to adding a cap full to 1/2 glass of warm water and then immersing the brass. Watch it continuously as it will start to darken and keep getting darker until removed. Rinse with cold water and allow to set for a few days before applying light machine oil ( 3 in 1 is very good if available ). Now getting back to the serpentine - ama-ooi fit, ... the serpentine should JUST pass the ama-ooi as it falls to the pan. Go slow, ... slight bending of the serpentine has much greater impact than you might visualize. Keep us abreast of your restoration. I will be posting on the NMB tomorrow a " How to make " ... an ama-ooi hollw pin article ... for those interested in restorations. ... Ron Watson PS. I see Justin just posted a patination process that I have never tried, but which you might want to try. No harm can be done.
-
Dear Brian, Your ama-ooi seems to be coming along nicely. The height of the ama-ooi varies from gun to gun. Rather than give you a definitive measurement ( impossible as they vary ), ... what you do, ... is looking at the side view with the ama-ooi in place ... the top of the ama-ooi should be approximately the same height as to be EVEN with the top of the barrel or one or two mm lower ... but not much ! The Serpentine should be virtually straight. You may have to remove the serpentine from the lock in order to see where it has been bent slightly awrigh. Be very careful as applying too much pressure when straightening it could snap it ... particularly if it is iron ( which yours is not ). It takes very little bending to make a huge difference in sideways movement, ... or perhaps your serpentine is a bit too loose where it fits onto the serpentine pin. This can be adjusted by either a very fine washer, adjusting the inward outward distance of the serpentine from the lock ( although the serpentine should just slightly rest against the lock ). ... Ron Watson
-
Dear Brian, I just measured 5 ama-ooi and they all measured 11/64 inch or as close as I can get in metric 4 mm - 4.5 mm. It is your serpentine that needs adjusting. It may be slightly bent inwards. The way to check if the serpentine is bent is to cock and release the serpentine to see if the head falls directly inline with the priming pan priming powder cavity. Send me some photographs. watsonr@mts.net ... Ron Watson
-
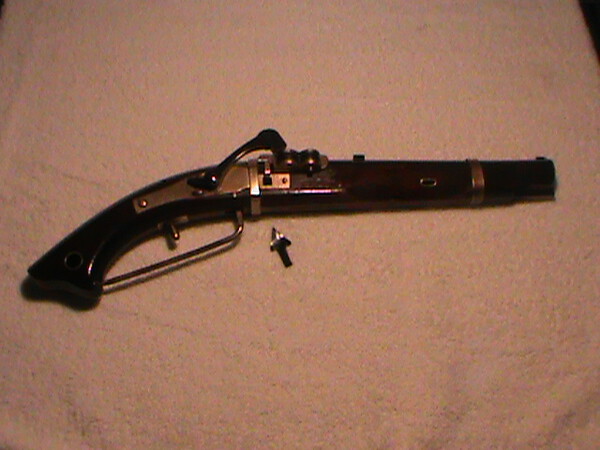
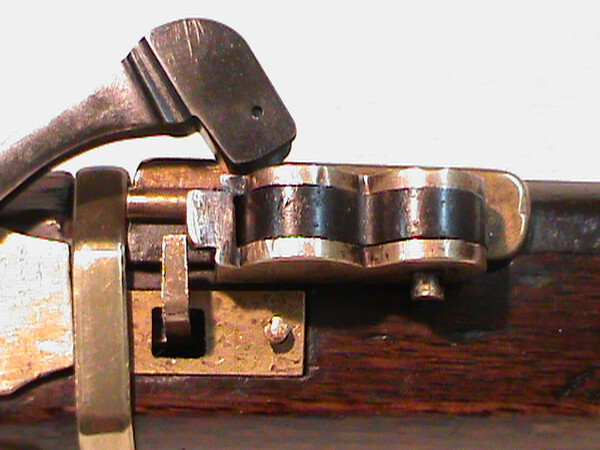
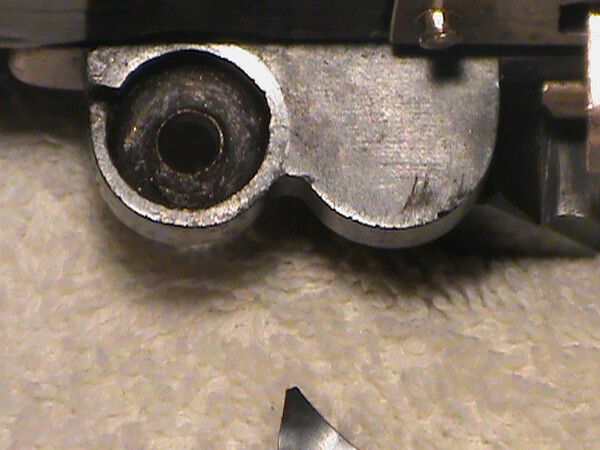
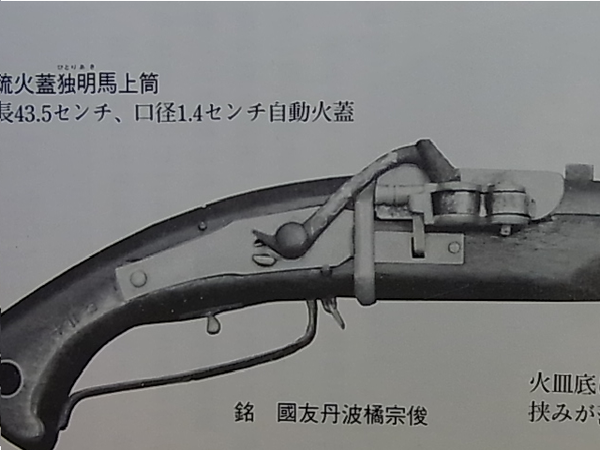
Back in March 2010, I posted an article on an unusual Tanegashima Pistol that I was restoring. I described an unusual feature on the pistol being a Box for holding serpentine pins. Although I had read somewhere about such pin boxes, ... this was the first example I had handled. Here is a link to the article : viewtopic.php?f=9&t=7047 Not only had I restored the pin box, but I had also had to remake several other parts including the Serpentine. There also had been some confusion over the maker of this pistol. Two possibilities existed : One was a gunsmith by the name of : Goshu Kunitomo Tanba daijo MUNETOSHI or possibly Goshu Kunitomo Tanba daijo YASUTOSHI. Well in the intervening years, further research into this pistol turned up another example which but for a few very minor differences was a twin to my pistol. In this case the name translates as MUNETOSHI, ... and being so similar I can with some certainty assign this pistol confidently to MUNETOSHI. The second thing that stuck out like a sore thumb was that my replacement serpentine was completely incorrect to the style of serpentine on the other pistol. I therefore made a duplicate of his style of serpentine and am well satisfied with the results. I attach a photograph with the new serpentine this time in steel rather than the previous erroneous brass. It was made using nothing more than a hacksaw, files, and emery paper. It fits perfect, functions perfect and looks correct. Although I was well satisfied with my restoration, ... I was busy writing an article for the NMB on restorations ( in this case making a hollow pan cover pin ) which I will post in a couple of days, ... when it occurred to me that the pan cover on my pistol had a solid brass pin instead of the normal hollow pin. I therefore decided what the hell, ... I might as well replace the solid pin with the pin I just made for the article I've just written. I therefore drilled out the solid brass riveted pin and noticed something strange. The pin had a cut running up the center obviously from the bottom but hidden by the riveting. Turning the pistol upside down revealed an aperture ( circular ... cut 17/32 inch or just over 1/2 inch wide and 5/32 inch or just over 1/8 inch deep ) in the forward underside of the pan tray. In addition to this there was a cut or slot made to the outside of the pan tray well hidden from view. Well, well, well ... this is something I've never seen before nor read about. I was going to have some thinking to figure out what this was all about, and why nothing was in the hollow and why the riveting covering the split pin ?? Several hours ( actually a couple of days later ) after contacting Ian Bottomley and Piers Dowding I got some answers. Ian was first to write back and suggest the possibility that the aperture might have contained a spring for a self opening pan. I decided the aperture must have at one time contained a coiled brass spring with one end locked in the slot and the other end into the center pin but I was not convinced of Ian's theory. Now here's the problem ... since the spring is completely hidden by the pan cover how do you get the end of the spring into the split pin, and even so how do you keep it wound tight ?? Well I found that winding the spring just so it would fit nicely into the aperture meant that it was tight but with little tension, ... and by taking the inside end of the spring and bending about 1/8 of an inch at a right angle it lined up dead center of the pin hole. Voila, .... putting the pan cover in place, and being careful to line up the slot in the pin and gently push it through, ... the end of the brass spring fit the slot with the bottom of the pin protruding thru the bottom of the pan cover. Things are beginning to make sense .... if the pin is turned from the bottom in a counter clockwise fashion, the spring wraps around the center pin so that when released the pin spins. Once the pin is wound and then making the pin solid to the pan cover ( I used a tiny bit of crazy glue so that it could be removed if necessary ) one could close the pan cover without problem, ... but the weak brass spring helped when opening the pan cover and certainly created tension to help keep it open. Mystery solved ... NO not quite. Ok, ... but how on earth can the pan cover be opened automatically ? It was about this time that Piers posted a photograph from an old Japanese reference book Sawada Taira's ... Nihon no Furuju picturing pretty much my exact pistol calling it an HITORI-AKI PISTOL ( opening by itself ). If that were not enough the pistol pictured and my pistol were made by the same gunsmith : Goshu Kunitomo Tanba daijo Munetoshi ! Please see the following link : viewtopic.php?f=15&t=6865&st=0&sk=t&sd=a&start=15 and click onto Piers photo R0010655.JPG The author describes the automatic opening of the pan cover by depressing the trigger. Upon examination of the mechanism on my pistol, ... it was easy to see that this would not work. Depressing the trigger would not allow for the pan cover to open before the serpentine fell. It was obvious that the ONLY way to achieve an automatic opening of the pan cover was for the act of cocking the serpentine to automatically open the pan cover. There is no doubt that Sawada Taira is INCORRECT in stating the pulling of the trigger activated the automatic pan opener, ... it is most definitely the cocking of the serpentine that does the opening. I therefore spent 4 days ( count them Ian and Piers ) ... 4 days long days of redesigning my PIN COVER to convert to an automatic pan cover opening lever ! It turns out I was correct, the only way of getting the sliding arm ( which had been my erroneously thought up ... Pin Cover ) to work the arm to push the pan cover partially open before the spring took over the balance of the movement was to put a small pin on the Serpenting square ended pin which engages upon cocking a small pin on the sliding arm which in turn pushes against the pan cover. Anyway, ... the bloody thing works ..... I can only be stunned by the imagination and inventiveness of this particular gunsmith and I would surmise and I think correctly that with all the bells and whistles incorporated into this pistol that it was most certainly owned by a VERY wealthy Samurai of considerable importance. Now, ... why do we not find this innovation on other Tanegashima, ... well my answer to that is that although a brilliant idea, the additional cost, the complicated mechanism ... plus questionable necessity ... just did not warrant this to become a popular feature. Even in this case somewhere along the line, the spring was removed never to be replaced along with the push rod ( arm ). It was just not worth the trouble, and on top of that the delicate mechanism would have been prone to jamming with the least bit of dust or dirt entering the mechanism. I know for a fact that this gunsmith made pistols identical to this one ( and the one pictured by Sawada ) WITHOUT this automatic opening feature. I have seen examples. Also since no one as far as I can see kept the innovation alive I can only assume it was a FAILURE ! Oh how I would love to have met this particular gunsmith. He was in some ways miles ahead of his competition. I have worked on countless guns over the years, but this one is special. Also interesting is a pistol by this man dated Genwa 5 means he was working in the early 1600's. A very old pistol with a lot of character. Some might even go so far as to say a pistol with character ... designed by a character ... and restored by a character ! ( I might add before I sound too boisterous that not always has the term " character " in my case been complimentary ) ... Ron Watson

-
Dear George, Thank you for your suggestion, .... but it has been already translated numerous times as reading RO or MICHI meaning " the way ". ... Ron Watson