


Nazar
-
Posts
216 -
Joined
-
Last visited
-
Days Won
3
Nazar's Achievements
")


-

Novel ‘oddity’ or painful to the eyes?
Nazar replied to Mark S.'s topic in General Nihonto Related Discussion
Encountered something similar at the local internet auction. Was curious about it, yet my curiosity ran away as soon as a picture of nakago was posted....


-
Ian, Mick, thank you both for the great input! Ian, it's definitely is the plot depicted in the picture! Mick, thank you for the picture from the book! The piece is indeed a papier-mache as it is made of brown paper and it indeed seems to belong to "Japonaise and Chinoiserie (Orientalism) decorative style made popular by the Empress Eugeniea, wife of Louis-Napoloen, last Emperor of France." And in this case it is even more curious that the legend made its way from Japan to France in the XIX century.
-
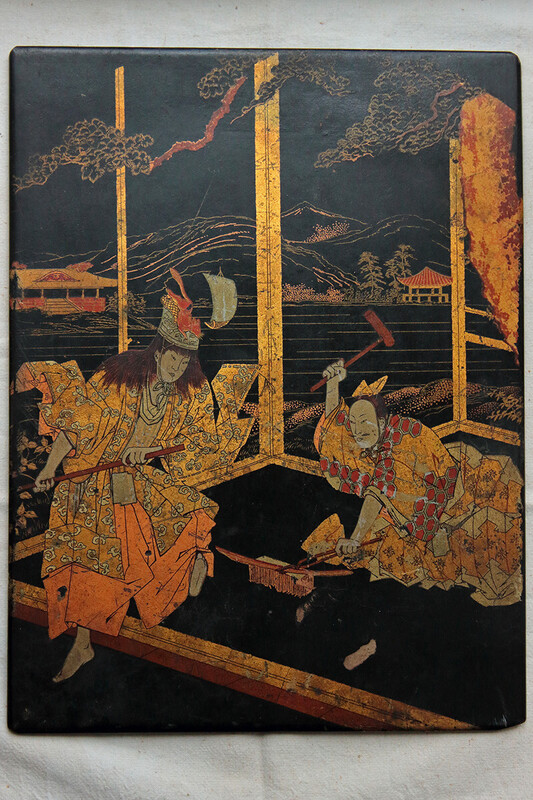
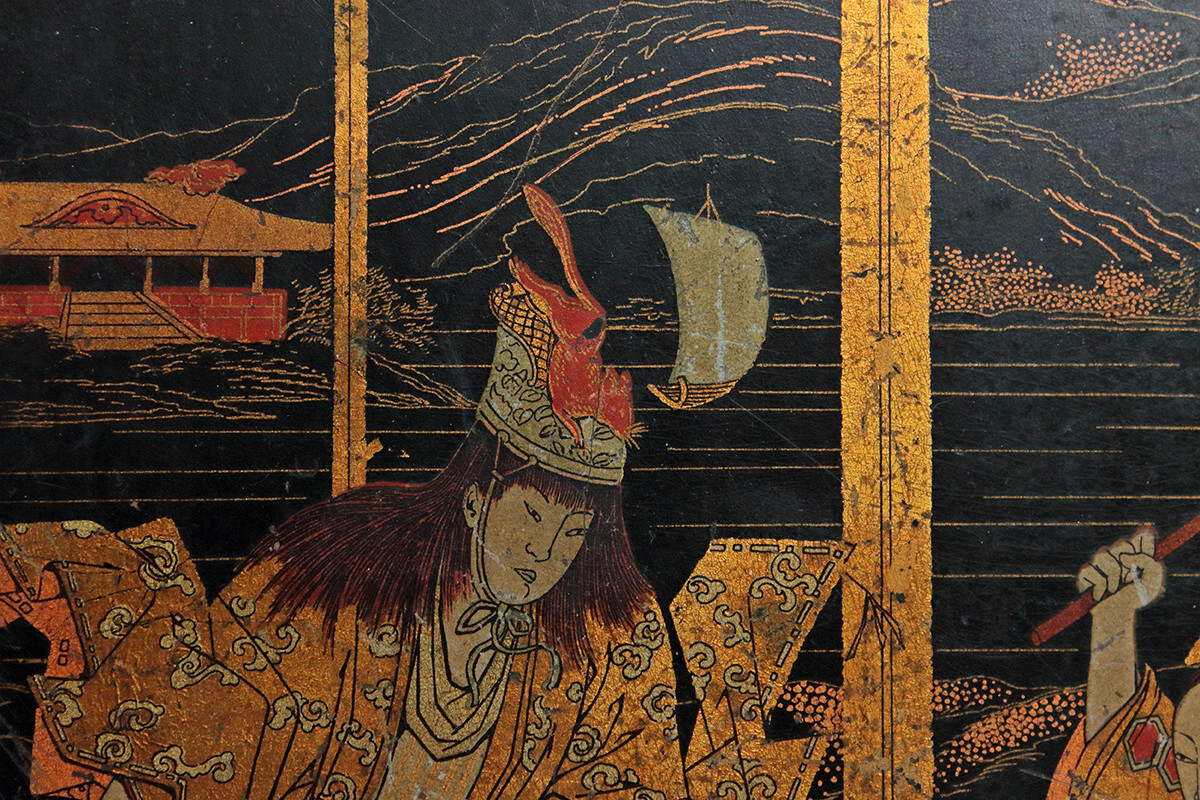
Was going through the listings of a local internet auction when I stumbled upon this lacquer panel. And since it featured two swordsmiths working on a sword, I bought it. It came cheap, less than 50 USD including delivery. It arrived today and I decided to share it here. Is this one of those panels that came in pairs and mainly were for selling them to Gaijin? Also I am very curious about the headgear of the swordsmith to the left. The dimensions of the picture are approximately 307x232mm. I also found a round version of this picture here: https://www.roseberys.co.uk/a0470-lot-494323?el=494323&lo=&pp=96


-
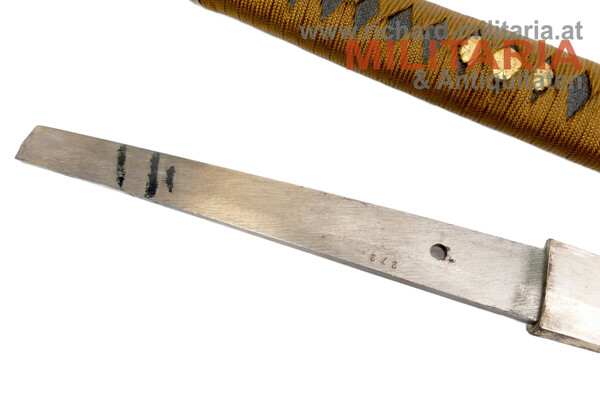
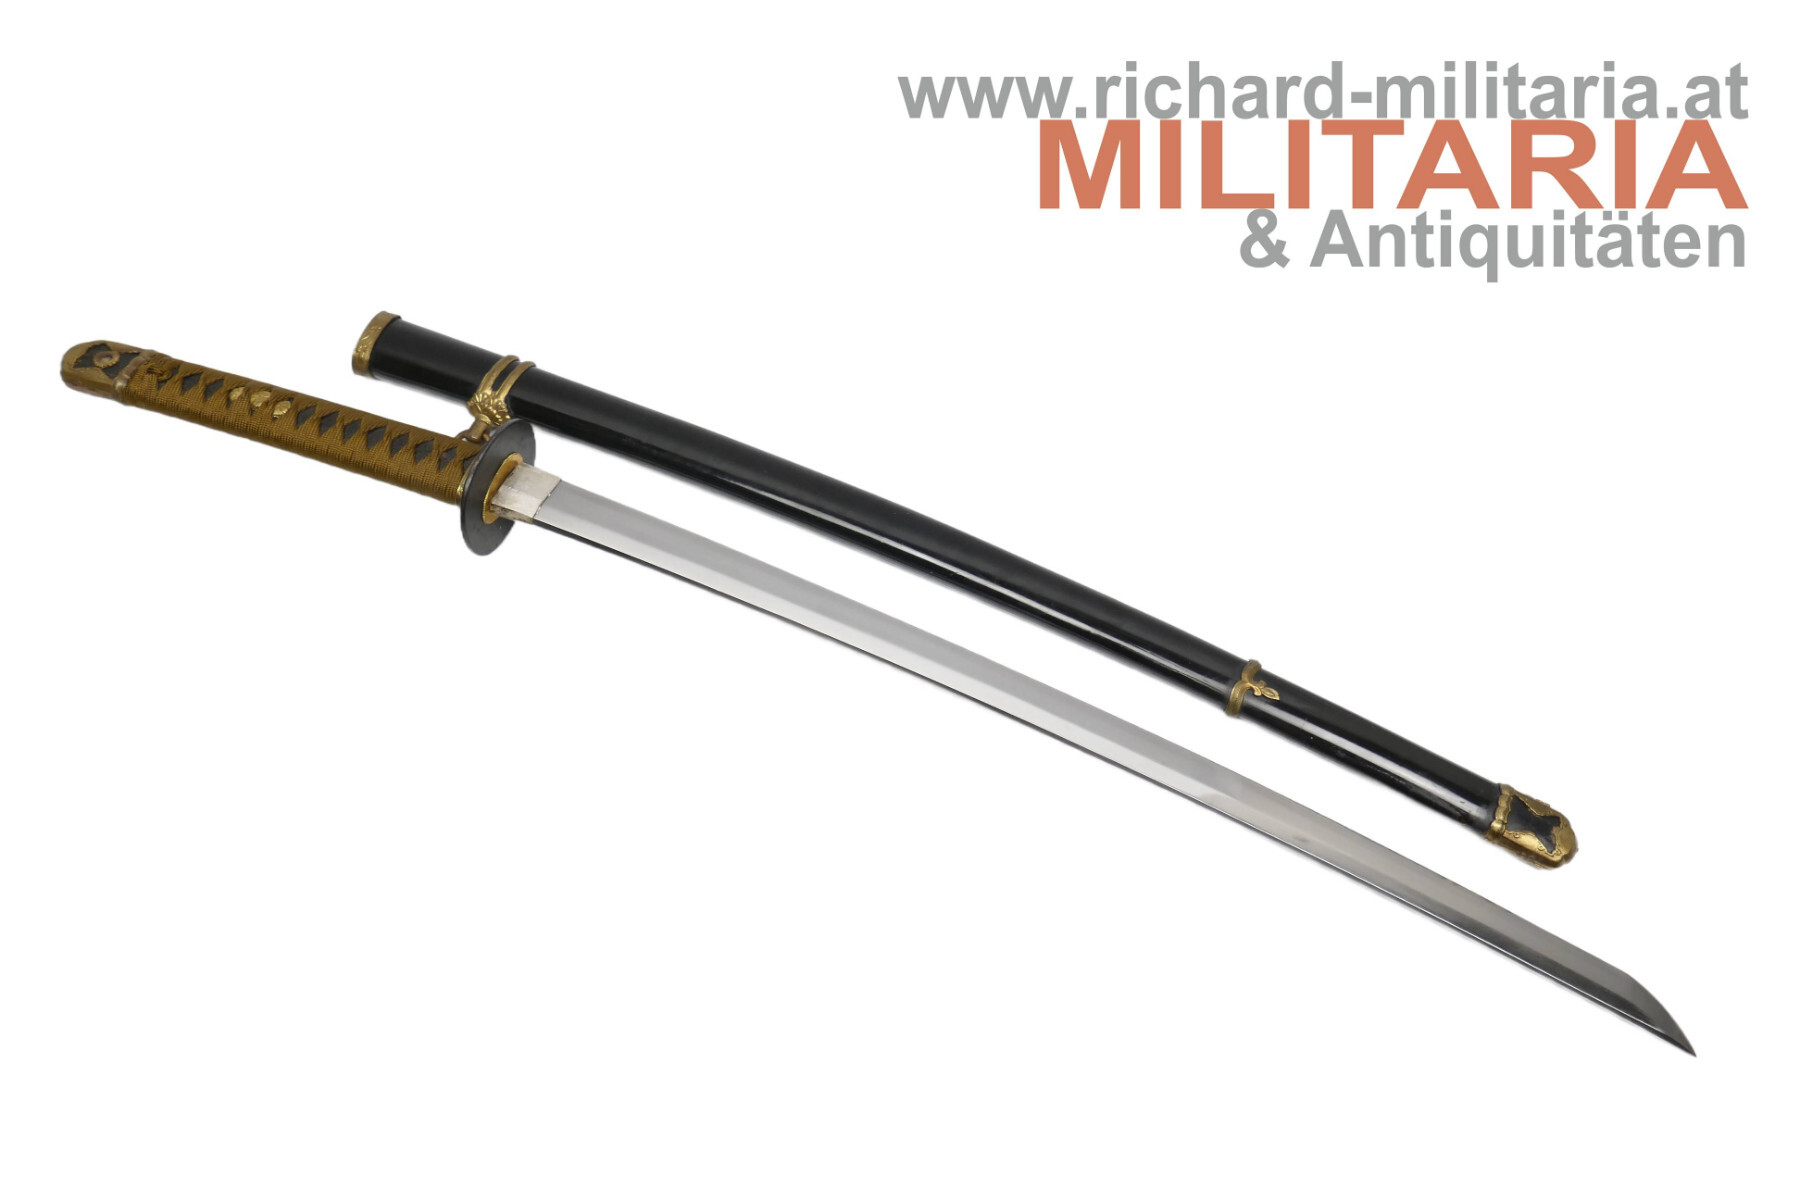
Number 272 popped out. https://richard-militaria.at/Japan-typ-98-katana-offizier-infanterie-shin-gunto


-
John: The main task is war, so I have to keep things more or less mobile. What I like about swords and other blades is that I could have some projects and working on projects serves like a safety valve. It's like returning to my pre-war workshop. But, unlike motorcycle projects, sword projects are much more mobile. When it comes to printers I chose the Flsun SuperRacer. I bought the first one in 2023 and it is still working, even as these printers (like any machinery) have to be maintained. As for the filament, I use CoPET/PETG locally manufactured in Ukraine. It is most suitable for the main task of my printers. Kind regards, Nazar
-
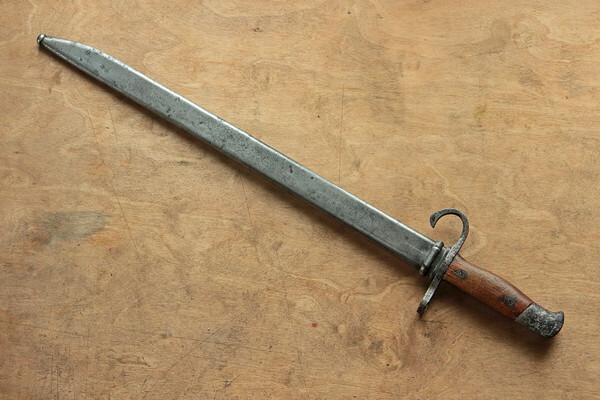
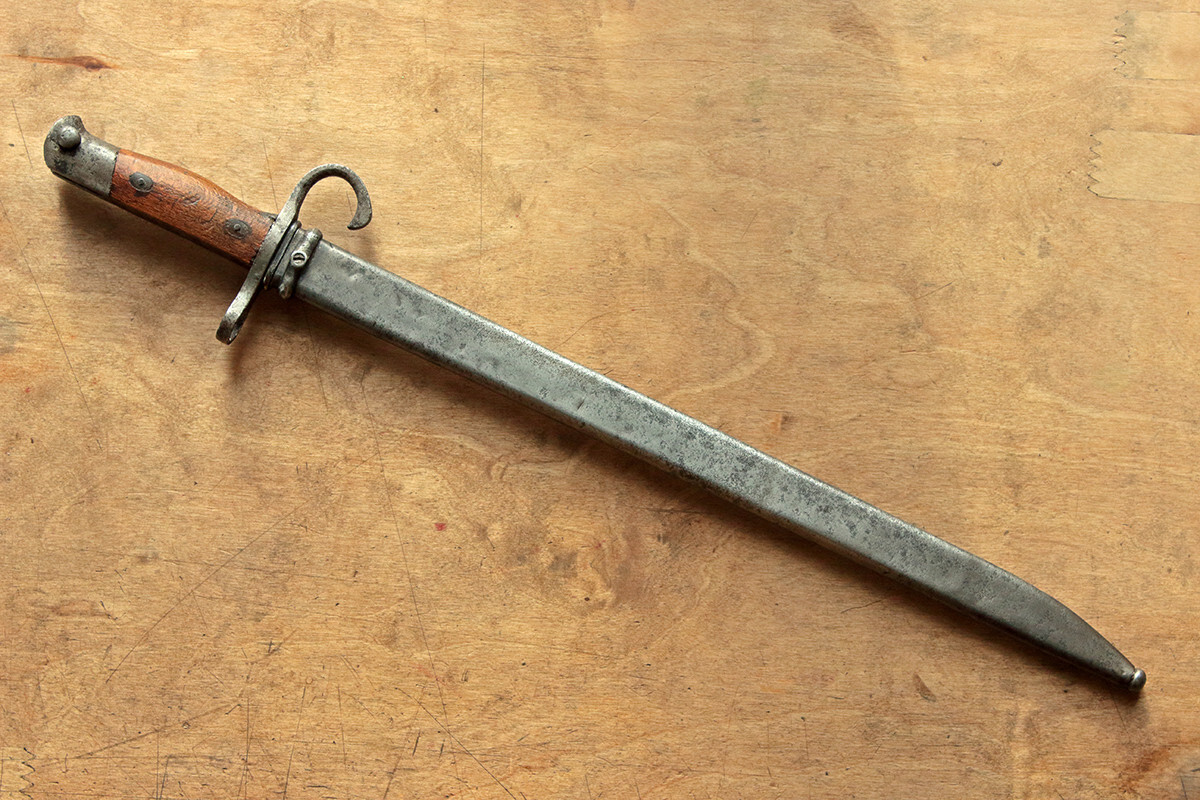
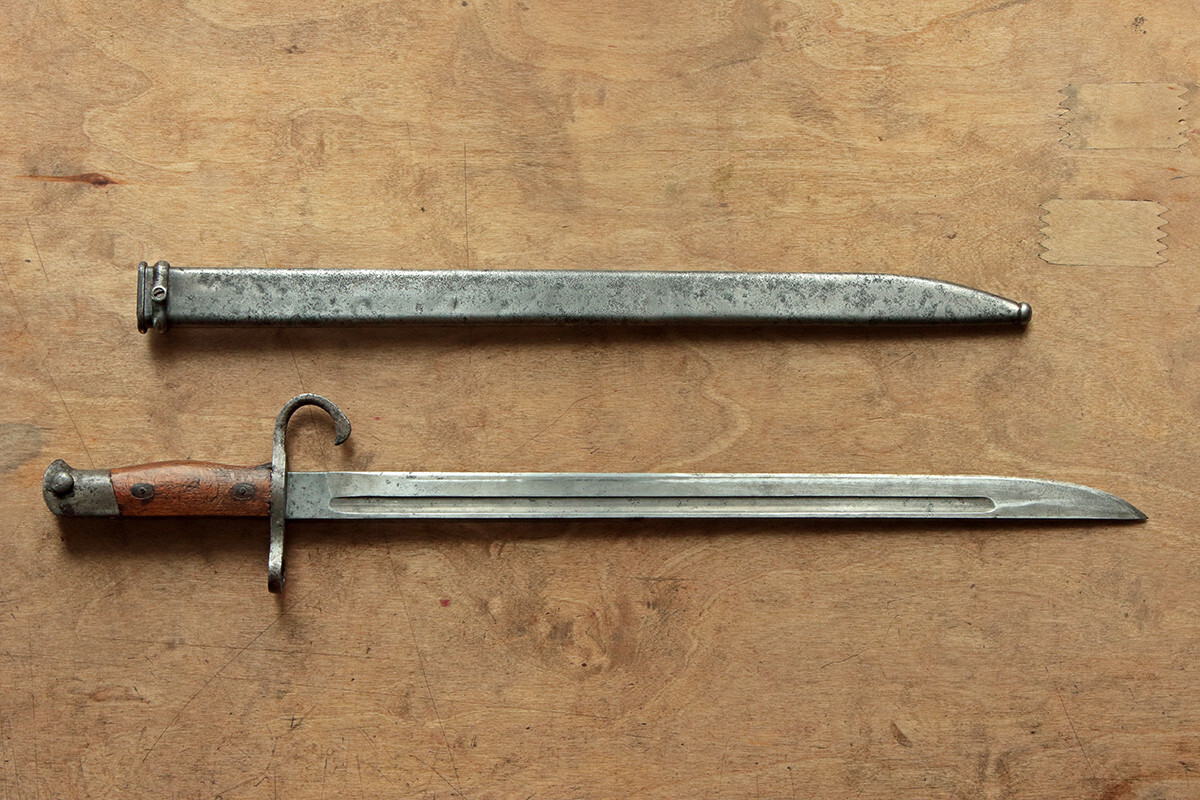
Some photos of inal result with bayonet.


-
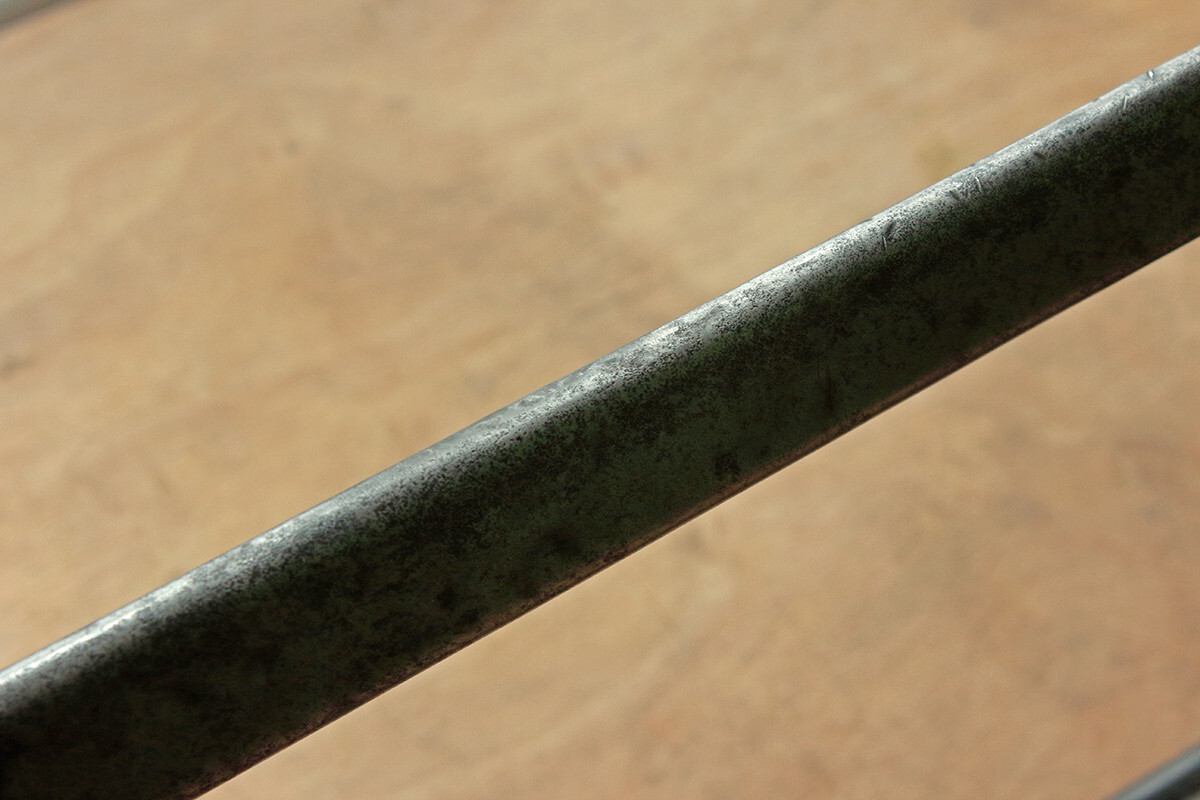
The result is not perfect, but for one reason, I didn't want it to be perfect. It's hard to put into words my opinion on the subject. These dents and scratches are part of this thing's history, yet there is a difference between total neglect/intentional damage and traces of time. I believe one has to work out his own opinion on every single case. For another reason, I greatly missed the variety of hammers I have in my workshop in Kyiv. To address dents like these properly, one needs not only wooden tools and plastic bushings, but some custom made copper and lead hammers. Some steel hammers too, however of a certain size and with a working surface of certain configuration. Yet, I did my best with what I had at hand. After I finished removing dents and straightening, I worked the surface using paper towels and abrasive solution until the scabbard looked like it belonged to the bayonet. Also, I applied some effort to the steel liner to ensure its smooth operation and make it look OK.


-
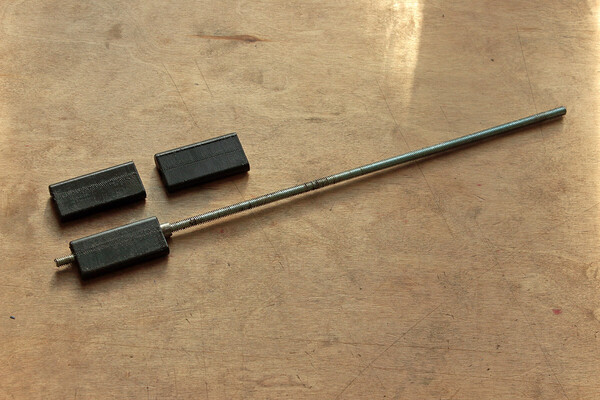
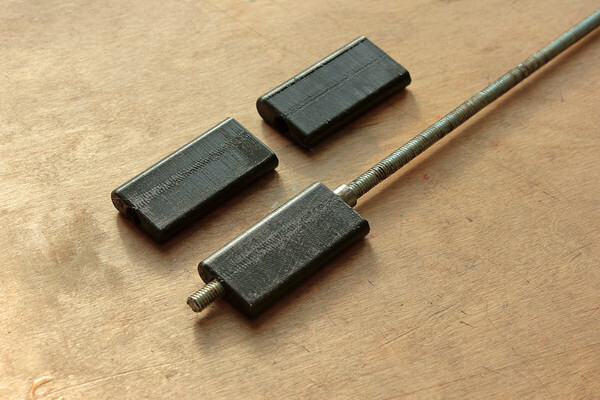
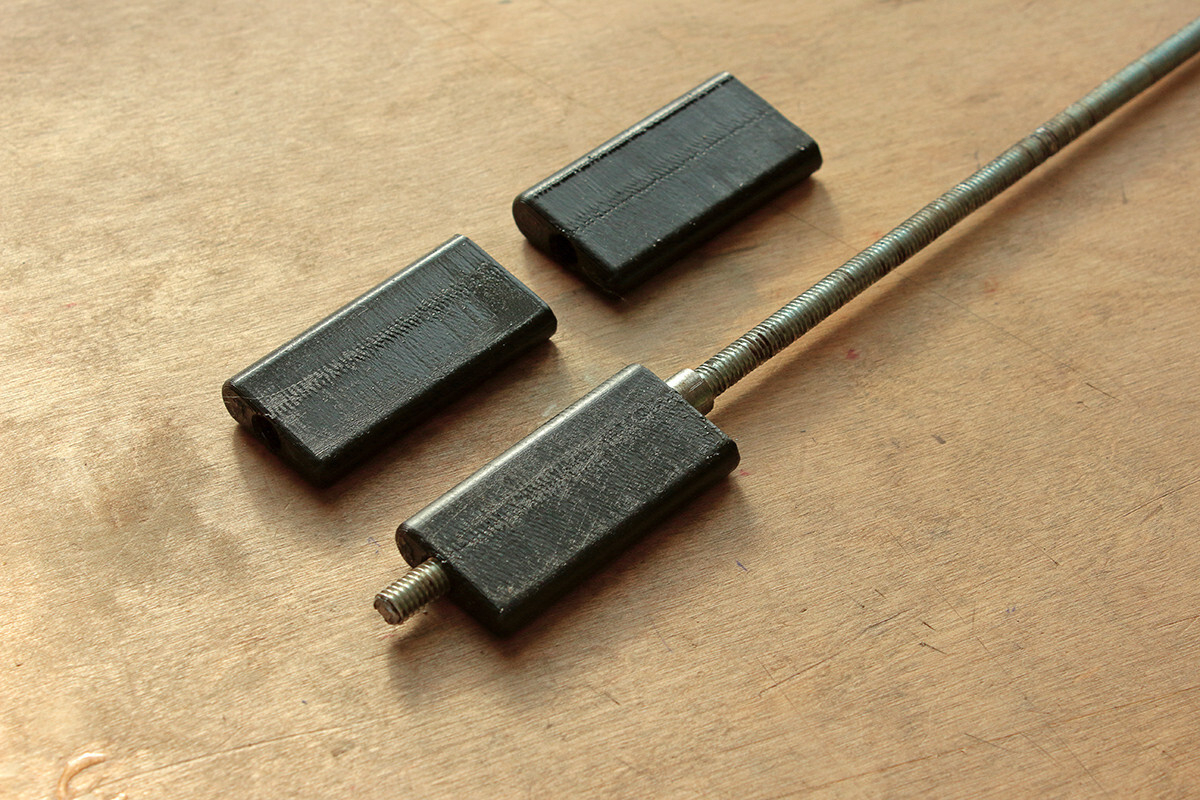
The idea with dents removal is simple: one has to design a series of plastic bushings of different sizes that could be put into the scabbard tightly. This means that bushing not only perfectly fits a cross-section of scabbard but it tapers slightly to its end and therefore it fits scabbard all along its length. Bushings are equipped with threaded holes, so they could be screwed on the threaded rod. Once the bushing is put on that rod it has to be fixed in place by means of a lock nut (ordinary nut, but grinded). Bushings have to be oiled before they are put into scabbard. Threaded rod allows to chase bushing down the scabbard. To remove bushing from scabbard one has to use a couple of washers and a nut. It is crucial to measure distance from the end of the rod to the beginning of bushing. In this way one could always tell where the bushing is. Therefore, bushing could be positioned right where the dent and dent is and what remained of the dent could be straightened by means of wooden rod. Bushings of different sizes fit different sections of scabbard. Using smaller bushings first allows to remove dents gradually.
-
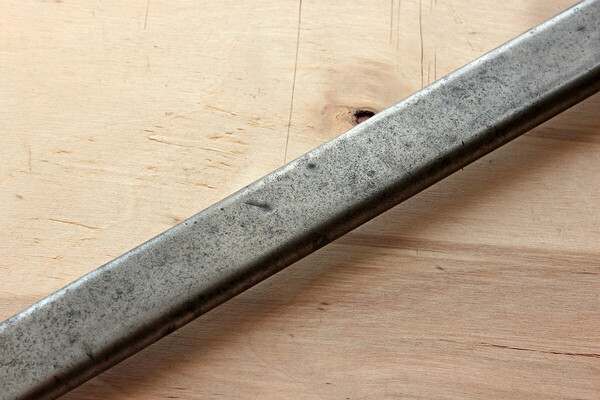
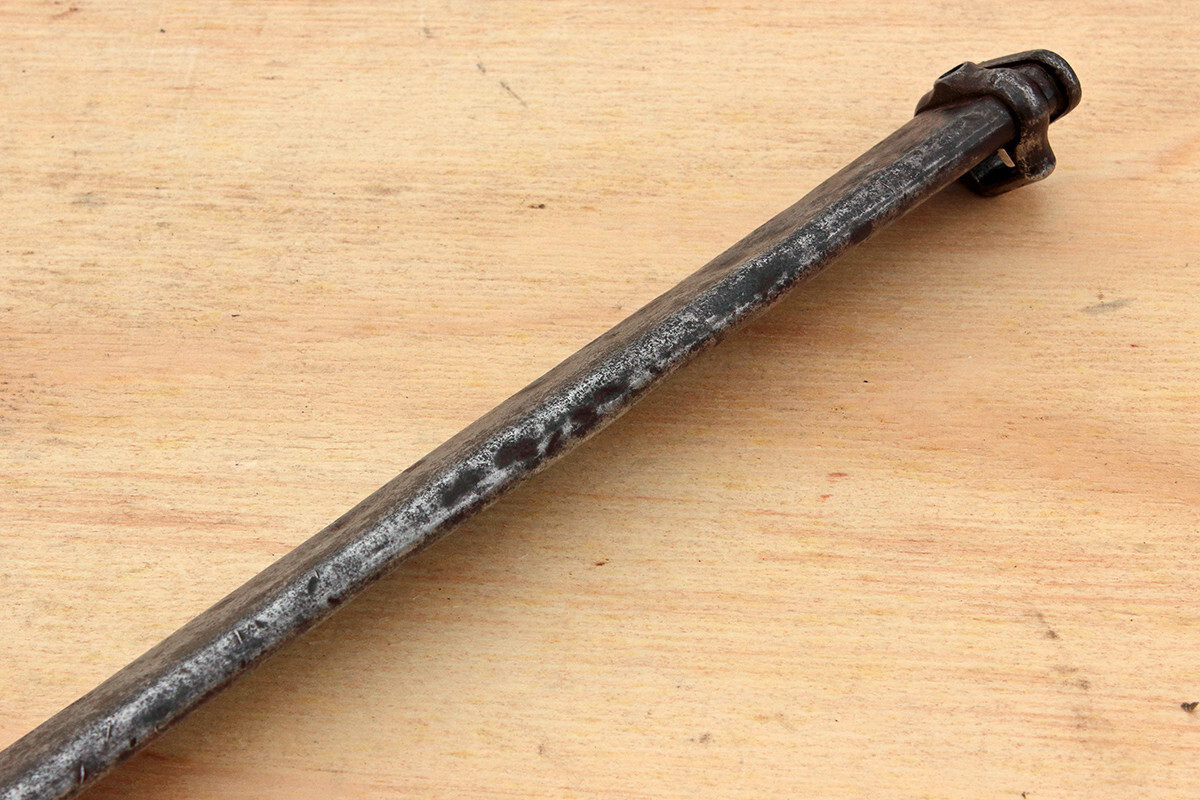
When I encountered dented metal scabbards for the first time, I figured out that this issue could be addressed by using 3D printed tools too. The only condition is that scabbard's inner liner has to be removable. It's quite easy with bayonet scabbards or in the case of European swords, where the liner is made of strips of thin veneer or. To show how dents could be fixed I shot some photos while working on this scabbard for the Type 30 bayonet. I have Type 30 bayonet without scabbard and sourced scabbard for it recently but it was in poor condition: not only dented but also slightly bent. Yet it provided a nice testing ground. I performed an initial "cleaning" to reveal all problem zones and only then I realised that I shoot no photos of the original state of the scabbard. However, I believe it's clear even from these photos. As for the cleaning itself, I do not use sandpaper or Scotch-Brite even for scabbards. Instead, I worked out another solution that was inspired by Uchiko powder. The idea is to use diamond powder mixed with oil. I found ready mixes (two of them of different grit) locally and tested them. Similarly to Uchiko it is a slow way, but it works and leaves no traces. I have no intention to use this method on Japanese swords, but I did use it for my another test project: Saxonian infantry dress sword restoration. I was satisfied with the result, therefore I used it for this scabbard too. So I removed the metal springy liner and found out it needs some work too.


-
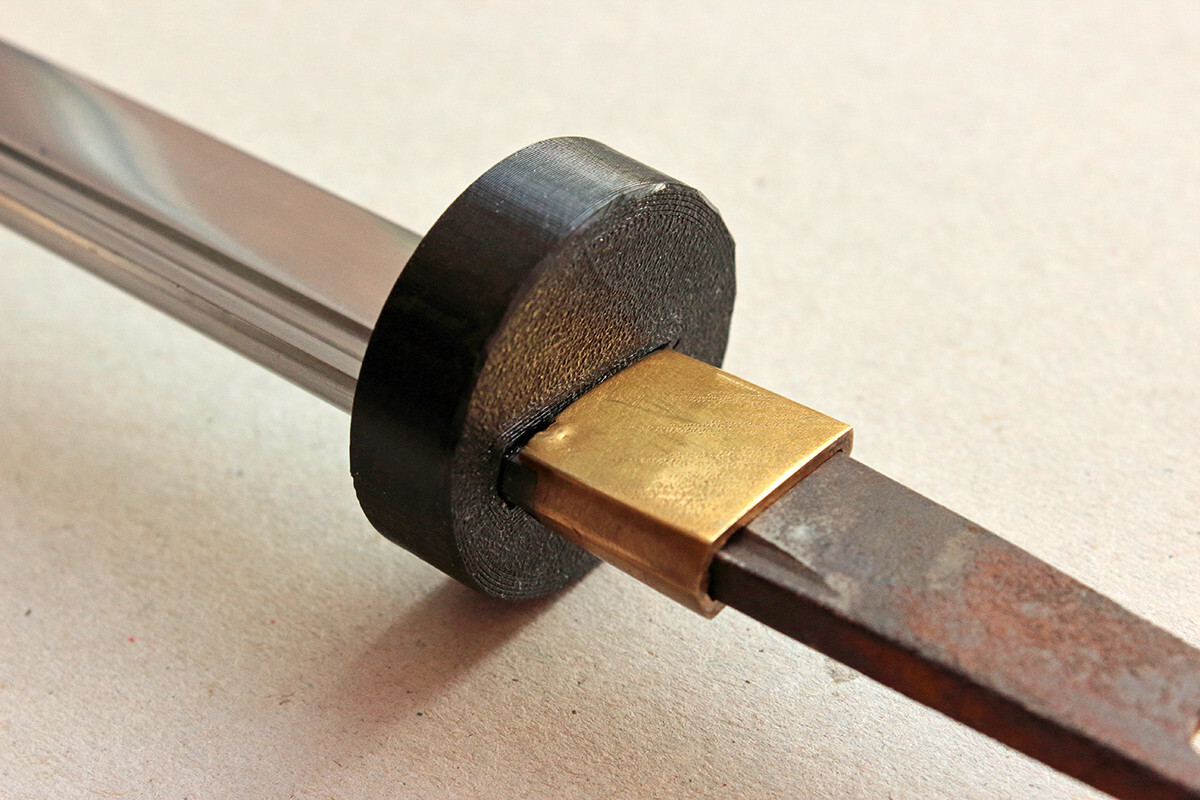
For the sake of not creating new topics, here is a bit of offtopic about 3D printed tools. The very first tools I designed and 3D printed were habaki removers for my navy dirks. I have a couple of them and with each I experienced the very same issue: habaki was impossible to remove by hand. Sure, there is a traditional method for removing habaki, yet dirks' habaki are tiny and thin compared to those of swords, so I was afraid to damage them. One of the diks demonstrated that this fear wasn't baseless as one of previous owners already slightly damaged the edge of habaki. So I designed a bushing with a hole whose shape corresponds to the cross-section of the dirk' blade. This bushing serves as a support and provides maximum contact with habaki. With this bushing a tap of rubber mallet on nakago jiri was enough to get habaki removed. In this way none of the dirk components were damaged.


-
I have seen this topic and was curious about this sword as it seems to be in Ukraine. Well, it indeed popped out locally. The price for this sword is insane, though. https://www.antik-salon.com/product/yaponska-oficzerska-katana-periodu-drugoyi-svitovoyi-vijny/
-
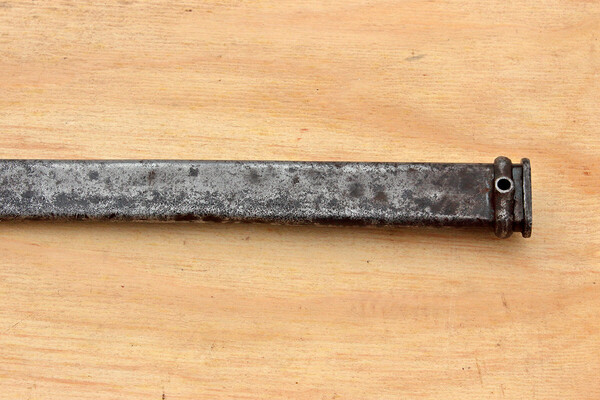
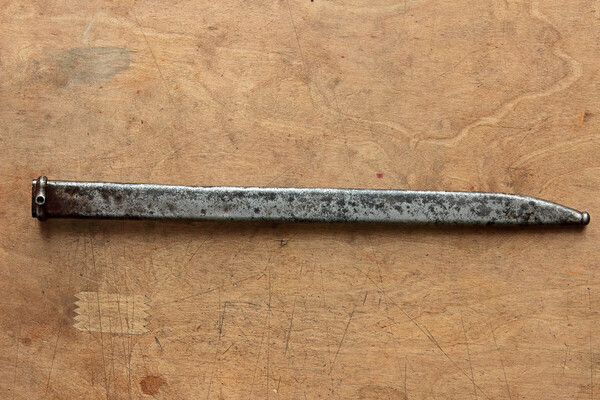
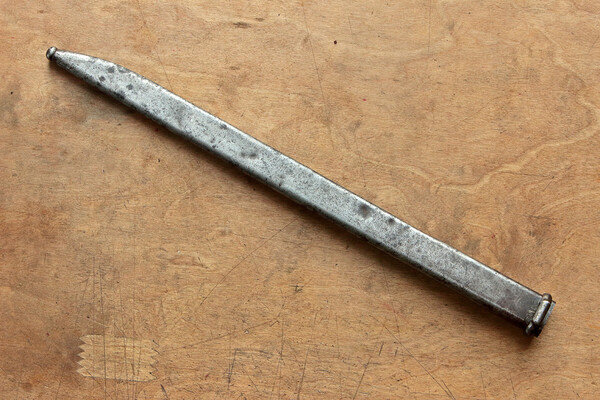
So I asked the seller to shoot photos of nakago with habaki removed. Only yesterday I received his answer that he tried, but he failed to remove habaki. He also sent some photos of nakago. One look at those photos was enough to lose all interest in this particular kai-gunto. It became obvious that the blade has nothing to do with the koshirae. And those person or persons who decided to put them together did next: First, they decided to drill a new mekugi-ana. The markings left on nakago clearly state that. I believe that the reason they didn't drill it was that tsuka at that position may have too extensive freeplay. So instead of trying to make some inner liners for tsuka, they just moved munemachi and hamachi forward, ruining the blade completely. To accommodate tsuka, they also cut off nakago-jiri. All these are clearly visible from the photos and it explains why the seller failed ro remove habaki. What has been done to the nakago is clear. I think the hamon also may be artificial. I am very interested in your opinion on the hamon, the balde and my observations.

.thumb.jpeg.fdacb0bded3abea158b2a3a3df66d1a3.jpeg)
.thumb.jpeg.a6b49a70925acc2db27df1f03001181b.jpeg)
.thumb.jpeg.a539f59e784137c3934ac529a896037c.jpeg)

-
This part of hamon line made me especially suspicious: This part of the blade also added some weight to my suspicions. Yet couple of photos.

.thumb.jpeg.82f859414539cf86aea7147161e685b1.jpeg)
.thumb.jpeg.7bc914bd8df8c58fc4f8351832f4f84d.jpeg)
.thumb.jpeg.07d8a0043dff054a7cff11c1fca8d9db.jpeg)
.thumb.jpeg.106871c533ba27a6dea870109a2c81e2.jpeg)
-
The general photos of the sword:


.thumb.jpeg.7cd2cbd9467ccb146729e59473cea96e.jpeg)
.thumb.jpeg.5cba3cbf81314f23b600b9bb44133923.jpeg)
-
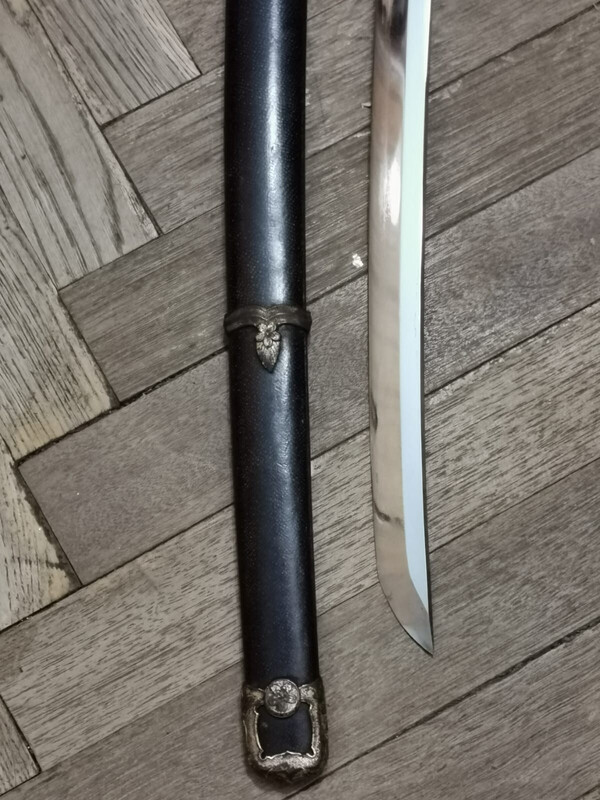
First, I have to say that I created this topic solely for educational purposes and to share some information (to give you an idea of what one encounters in our neck of the woods). I am not about to buy this sword as I already could see why I should pass on it. So a few days ago I was offered to buy this kai gunto by the seller who had it on commision. The seller sent some photos. I like its koshirae a lot, especially ray skin saya. Hope one day I'll buy a decent kai gunto with such saya. However, a couple of things instantly striked me as weird. For one thing, the blade looks to be buffed, yet the line of hamon is clearly visible. For another, the koshirae looks more or less untouched, yet the habaki have signs to be heavily sandpapered. Some photos of koshirae:


.thumb.jpeg.1003bb1f515a0dec126df987149b71c2.jpeg)
.thumb.jpeg.21627a3ae06716526c7cd76f91a29db2.jpeg)
.thumb.jpeg.0229fe4ce3f2711884e4c15aa77badd3.jpeg)


.jpeg.98d2c7af5a3a1d2370d432191f2a95bd.jpeg)
.jpeg.5b02ba467465aebf5c7ab974d871b25f.jpeg)
.jpeg.6a45420b2a02262a0f99cd95c80487ad.jpeg)


.jpeg.c15452d3c30463b96718ad517b2ceeef.jpeg)
.jpeg.b16928361ffa5367945ac23a578487a1.jpeg)
.jpeg.45cbf06930ed15d6a8d102eec0ae1a95.jpeg)
.jpeg.af40dee3201017d1fa1c7b5e1a2021a9.jpeg)


.jpeg.c8ec4a43c9fb602c2aa3347f1ad9a392.jpeg)
.jpeg.91efb85a9f5086bba06155c10805d4be.jpeg)


.jpeg.854c1619d295e92c703956478fe6bcc8.jpeg)
.jpeg.2abd9d0abec3ab9e1c84f18c67be8379.jpeg)
.jpeg.81f8299f67f04226843d2e7c74e708e1.jpeg)
