Toki
-
Posts
61 -
Joined
-
Last visited
Content Type
Profiles
Forums
Events
Store
Downloads
Gallery
Everything posted by Toki
-

Novel ‘oddity’ or painful to the eyes?
Toki replied to Mark S.'s topic in General Nihonto Related Discussion
Regarding the orginal blade that was posted, it would depend on a lot of things for me. If it was from my favorite school, with all the features there to enjoy that I was looking for (minus the boshi), and the price was right, I would probably get it. I think as odd as it is, it could be a fun piece for a collection because of its unusual shape. If you can get it for a fair price, I guess -
Seems like it? Good spotting though
-
While papers are nice and as a beginner myself I too look mostly at papered blades, the more important thing is that you like the blade itself. The Topic wether to buy papers or the blade has been discussed here a lot, so if you are interested in reading about that, there is a few posts😅. For me personally they are just a level of security, since with my limited knowledge it is easy to make mistakes. Although, if I saw a blade I really really like without papers I would probably go for it. Your Waki is an attractive blade and I´m sure you´ll have a good time studying it! The Koshirae adds to that as well, of course.
-
I was just about to post that. There isnt too much difference between the two
-
Increasing Gold Membership numbers?
Toki replied to Brian's topic in General Nihonto Related Discussion
Just came across this thread and decided to apply for a gold membership as well. While none of the upgrades impact my activity on the forum, I find 6 Euros a month more than fair for the amount of knowledge accumulated on here. -
Nice find and a pretty sword! The mix of rust and shiny spots on the Nakago make it look more modern than old to me, as if its not completely oxidized quite yet. But I am just a beginner myself, so wait for a more experienced member of this Board.😅
-
Thats a beauty with a nice long Kissaki...
-
If it was a legit nihonto at some point, I pity the poor thing. Such an abused blade
-
Heya James, Thats a lovely Waki you have there. 23.75 Inches is indeed quite long, just below 2 Shaku with a nice unshortened Nakago. To me it looks like a late Muromachi/early Edo era blade, but I will leave that to the more experienced members here . I am just a beginner myself Best of luck with it!!
-
Interesting! So far I have ony cut with modern chinese reproductions with modern steel, and even after a year of regular use the scratches are nowhere near that level. But maybe Tamahagane is a bit weaker in terms of material. I would be too scared to cut with a nihonto anyways...too much money I could ruin.
-
I agree, looks like angle grinder 😅
-
This is so so cool! Thank you for putting in all that effort, Hoshi.
-
British Museum: A step into the world of Gen Z
Toki replied to MassiveMoonHeh's topic in General Nihonto Related Discussion
As a Gen Z, I would be entertained with less visual effects as well I am usually more interested in whats in an exhibition than how it looks visually. After all, I am there to learn something new. -
Oh nice, a turtle Fuchi :D
-
Can´t say much about the blade, but the mekugi ana looks a bit off
-
Yes, exactly they look so big when in reality it is around 1 or 2mm at most. Had me scared for a second when I saw them in the pictures That is a lovely piece, especially the details on the saya.
-
And some more
-
Here are some more pictures. The big rust spot is below the Habaki.


-
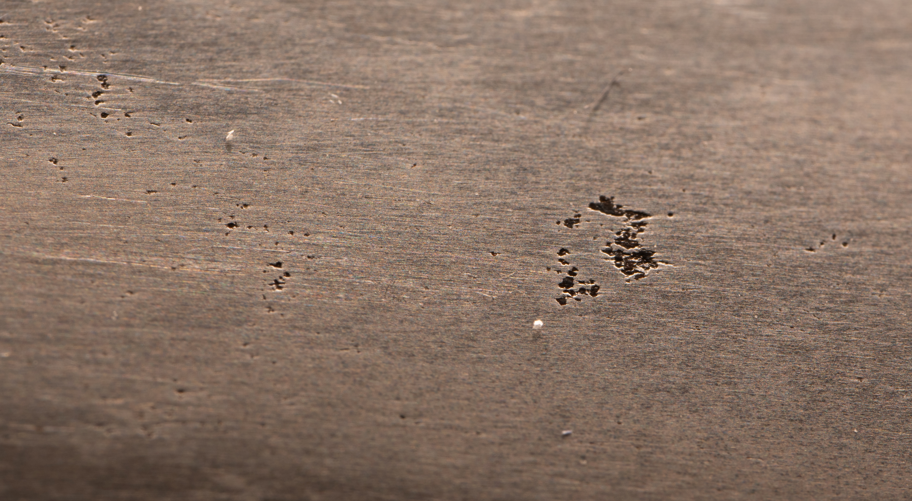
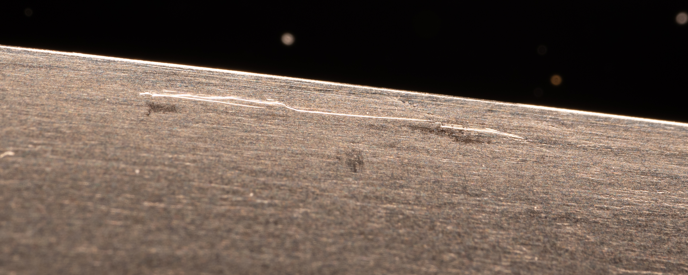
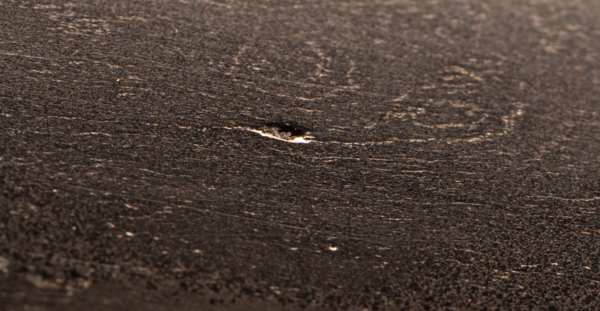
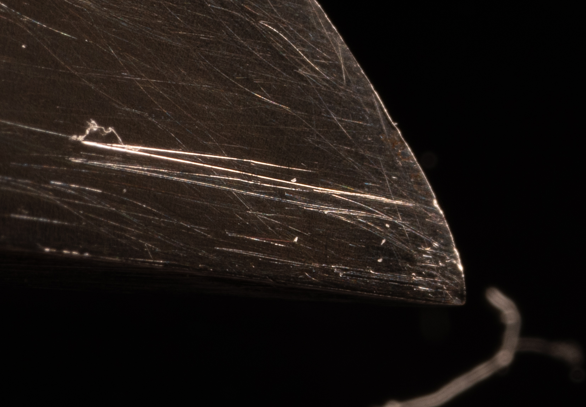
Good evening everyone I hope everyone had an amazing christmas and got safely into the new year. Since my last post in october of last year, I was sort off burnt out on the topic of Nihonto. Probably trying to learn everything at once over the past year was not the right choice, like it is with university exams. Now, since a good 2 month break I finally have motiavation to dive back in. Over the past few days I reread all of the comments below my last post about photographing Nihonto as well as Darcy´s guide to find out what the most key points to improve are. But as last time, the results this time are far from perfect, although a good bit better than last time in my eyes. Setup For the setup I tried to copy Darcy´s guide as much as possible, using a glass floor from a shelf as the display base, with a warm white LED bar as the light source laying on it to provide equal lighting over the full lenght of the blade. Also, I covered the floor below it with near black (a very dark blue) cloth and had the glass panel a bit above it to create a sort of clean blackground. This enabled me to move the sword across rather than moving the camera. Speaking of the camera, it is still a Sony A6400, although this time fitted with a cheap makro lens I picked up not too long ago, namely the Peargear 60mm f2.8 MK2. I have been using it for nature photography over the last week and for the low price I am quite happy with this lens. I also got myself a tripod, giving me more freedom and flexibility in positioning the camera; especially compared to the music stand I had it strapped to last time. The Nihonto is still my Tensho era Wakizashi attributed to Noshu den Kanesaki. It is unsigned and not a masterpiece by any means, but it is fun to experiment and study with. This time, I mainly focused on the flaws of this blade. I was aware of all of those as I was informed by the seller during my visit at their shop as well as in our email converstations prior to the appointment, so there weren´t any bad surprises (fortunately). It is mainly a bunch of inactive rust and lots of little scratches. Although, there is what I think is a big scratch along the hamon on one side, please let me know if it is something else. Also, while reviewing the pictures in Lightroom, I noticed those little blue streaks, which I have never seen before, but I think they are longitudinal chromatic aberrations and not a flaw in the blade. I will try to fix those in the future. I will leave pictures of the flaws (and some features ) of the blade down below. If you have tips on what to further improve, I am looking forward to any kind of feedback :D Best Regards Erik


-
For sale: Mumei wakizashi koshirae iron fittings
Toki replied to Ron M's topic in Swords and Edged Weapons
No idea why, but i love that saya -
Photographing Nihonto (my experience)
Toki replied to Toki's topic in General Nihonto Related Discussion
Thank you so much. I read something similar in Darcy´s article and am working towards a setup like that in the future I have an APS-C sized camera at the moment, although no macro lens (yet). The Tamron is nearing macro level, but of course no comparison to a dedicated one. Also that 2nd, close up shot looks insane! Indeed, they are the bane of me for now -
Photographing Nihonto (my experience)
Toki replied to Toki's topic in General Nihonto Related Discussion
Those are some beautiful photos Adam. Especially the one of the Boshi. May I ask where you had the light come from for that one? So far, my pictures of the Kissaki always have been either out of focus or with bad lighting, so it´s needless to say making out the Boshi is impossible. I´ll post two regardless, one with my phone and one with the camera yesterday.

-
Photographing Nihonto (my experience)
Toki replied to Toki's topic in General Nihonto Related Discussion
Thank you @Lewis B for sharing those pictures. Those are some absolute beauties, even the Iphone shot is really cool. Shows that the photographer is more important than the equipment I totally agree with you that a macro lens is needed for capturing the maximum amount of detail and I plan on getting one in the future as well. For now, the Tamron is near macro level enough until I find a cheap one on ebay. The smarter way for me is probably investing in a decent setup with better (and different) lighting and a proper tripod. Unfortunately we swapped all lamps to LED a few years back, so I will need to get a halogen lamp/ normal light bulbs. I do have an old Sodium lamp though, so I might experiment with that. And lastly, for the next one I will for sure dust off everything around the blade first. I only realized when looking at the photos in Lightroom that there were particles here and there on the blade. Also, thank you so much Jean for clearing that up. You are correct, taking pictures, while challenging for me, is actually not the main problem. As a beginner its hard to know what exactly I should look for and what to photograph exactly, so i mainly tried to replicate what I see here on the forums. Unfortunately my current setup doesnt allow proper 90° top down shots, and certainly not in the correct orientation, but I will try and fix that in the future (along with lighting and background). Personally I found the kissaki area the hardest to shoot and did not manage to get decent lighting on it yet. I will update once I managed to build a proper setup Much thanks to you two again! Best Regards Erik -
Photographing Nihonto (my experience)
Toki replied to Toki's topic in General Nihonto Related Discussion
Great Idea, thank you! -
Hello everyone :D As mentioned in my previous post, I had the pleasure to receive my first Nihonto last week. It´s been bringing me so much joy and motivation to learn more about those beautiful pieces of art. Naturally, as a hobby photographer, I always wanted to try taking pictures of them and now that I got a blade of my own, I can finally try my luck. It is a whole new field of photography for me, one that I am, quite frankly, unprepared for. Usually I shoot Landscape and Nature, with the occasional plane spotting trip to nearby military air bases. Macro photography however is completly new to me and my lacking equipment (I don´t even own a tripod. Foolish, I know). Reading all the resources and past posts here on Nihonto Message Board, especially Darcy`s PDF file about this topic, really helped me getting started and giving me a rough idea what to do and what to avoid. While it´s not exactly the setup mentioned in that article, I tried to copy it with what I had. I went with the following setup (will leave a picture below). For the enviroment I used the wooden box usually used for painting model planes with an airbrush. I hung up some dark cloth in it to have a proper background and placed a daylight LED-Panel on the Plexiglass roof of the box for the lighting. I used a secondary lamp for some diffusing background lighting and to set accents in the pictures. Since I do not own a tripod, the camera was fixed to a music stand using a cable tie. For the camera I used a Sony a6400 with the Tamron 17-70mm f2.8 lens. I chose it over the Sigma 30mm f1.4 for its lower minimum focus distance of 0.19m at wide angle of 17mm (~25mm if we take the 1.5x factor for APS-C into account) and 0.39m at maximum focal lenght. In terms of settings I chose a focal lenght of 25mm and apeture of F4.5 since I found that as a sweetspot where it is the sharpest in the past. I wanted to keep the ISO at 100, even though the a6400 has good noise control up until around 1600 ISO, as I worried it would interfere with the Hada and other details in the blade. Shutter was set at 1/15s since I was shooting on a stationary position anyways and not handheld. Personally, I would say for the second try ever at this the pictures are quite okay. Compared to the pictures in the last post I find the current ones a big upgrade. I found a big spot without Hada which I suspect is core steel (marked in red, correct me if I am wrong) that I somehow overlooked when inspecting it at the shop. Also, some little rustspots, scratches, and a few nicks in the mune, but I was already aware of those as the seller mentioned them in the listing. Overall, I find the blade quite nice to look despite those things listed. I will post a few of the better pictures below. All the pictures are cropped and compressed to JPG so I can do them all at once. If anyone wants the full sized ones, let me know. Also, any tips for better pictures are of course welcome! Thank you for listening my Ted Talk Have a nice day/night everyone