Nazar
-
Posts
216 -
Joined
-
Last visited
-
Days Won
3
Content Type
Profiles
Forums
Events
Store
Downloads
Gallery
Everything posted by Nazar
-

Can someone tell me what type this is please?
Nazar replied to Joshcamsoup's topic in Military Swords of Japan


-
Can someone tell me what type this is please?
Nazar replied to Joshcamsoup's topic in Military Swords of Japan
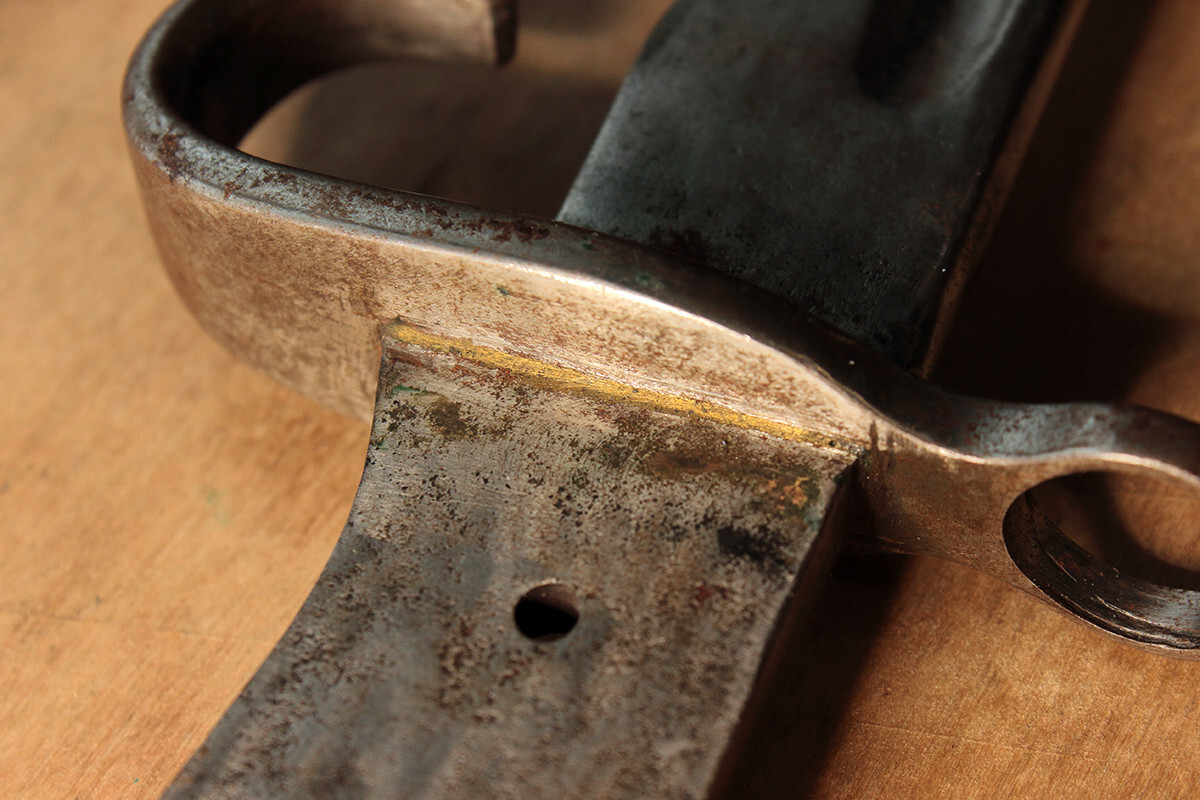
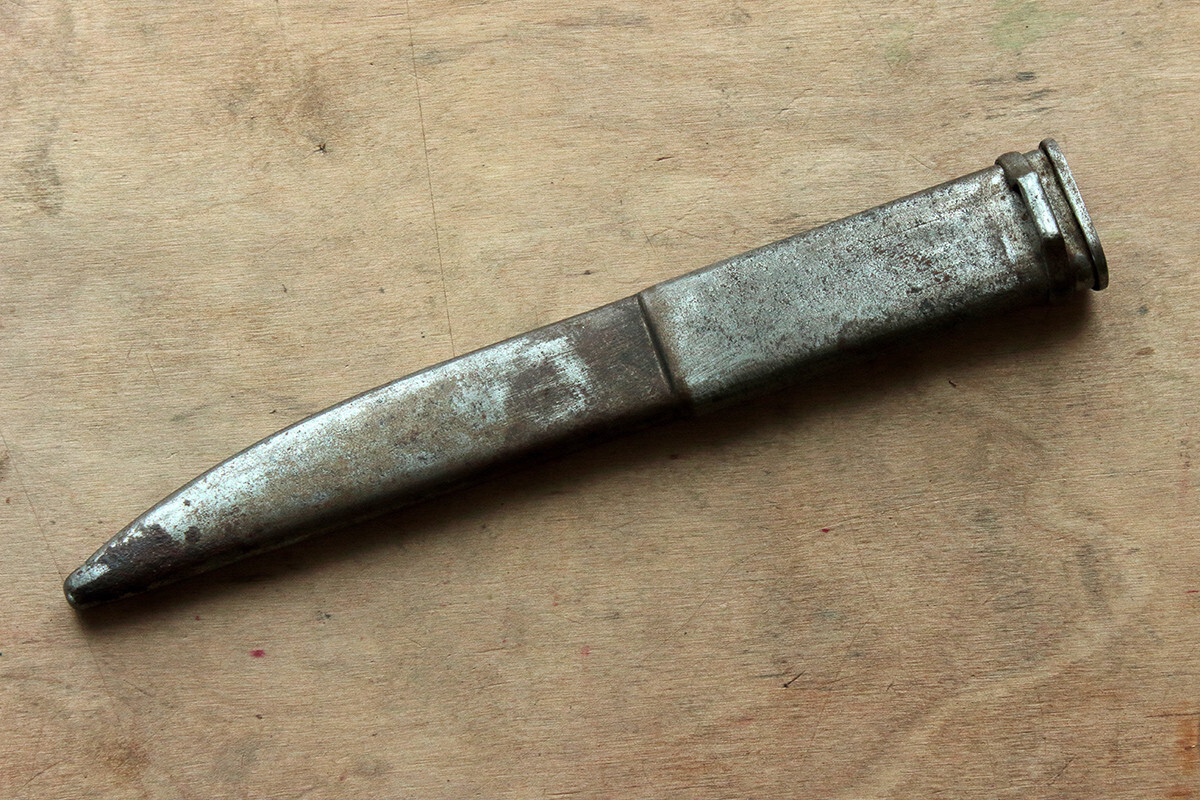
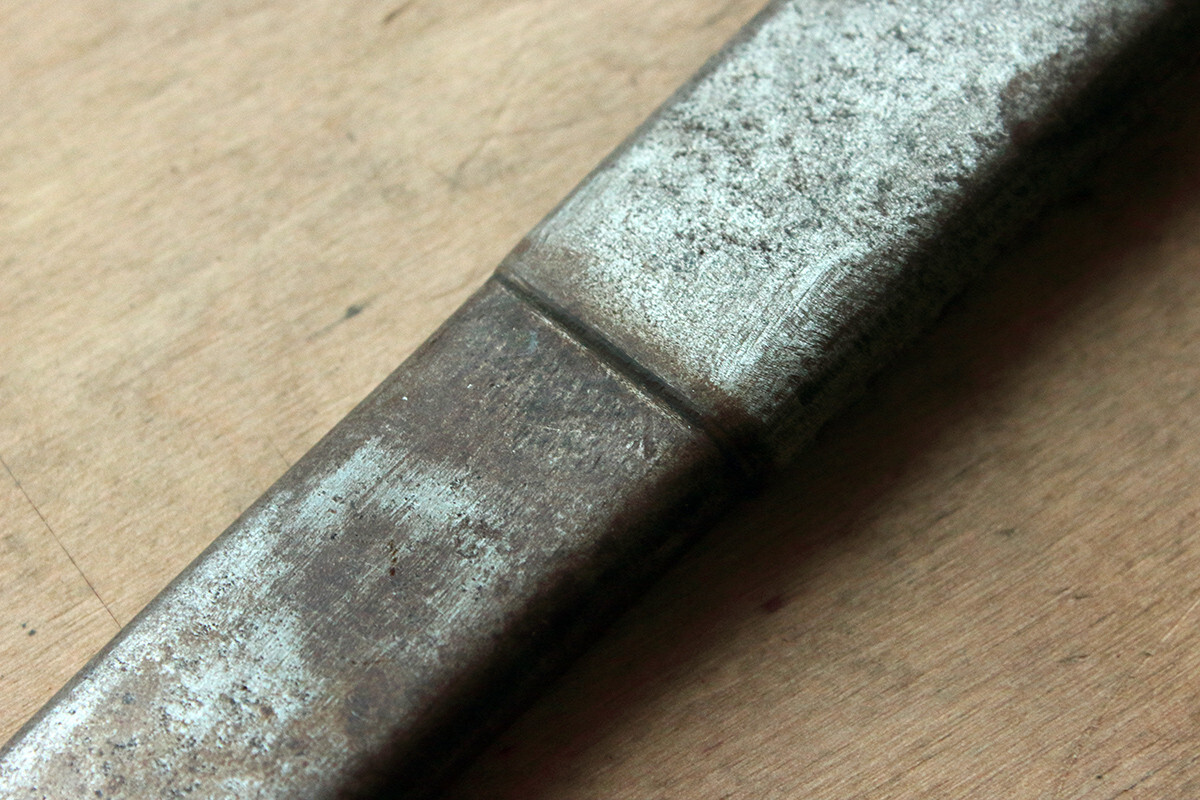
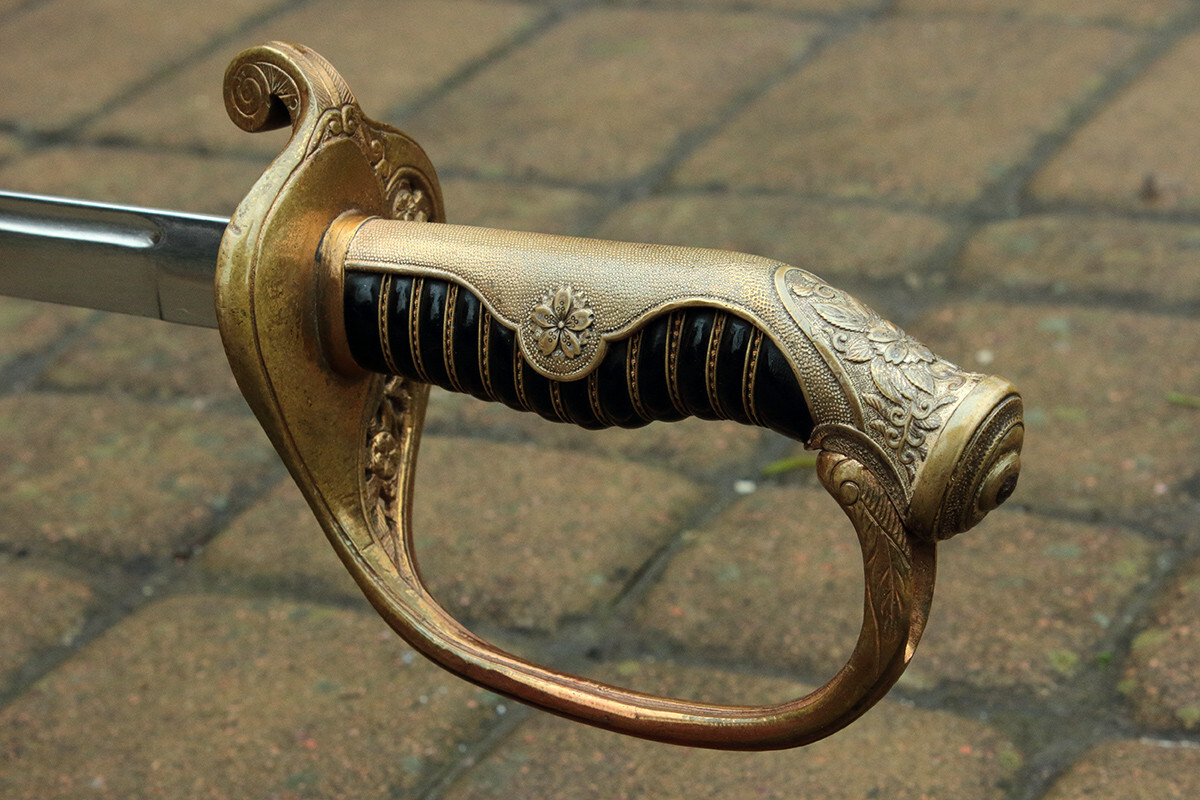
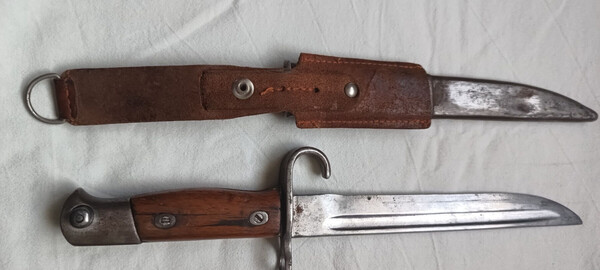
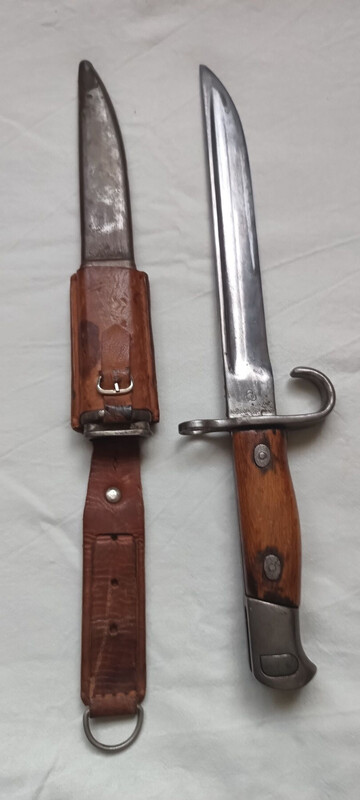
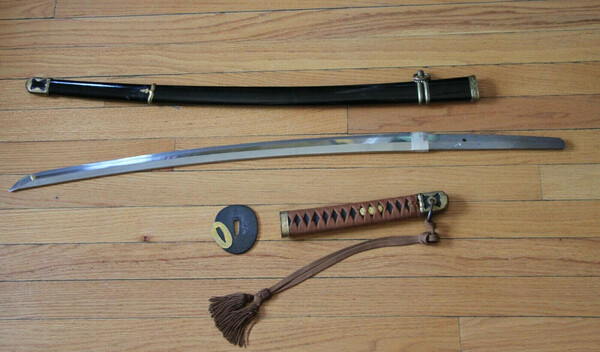
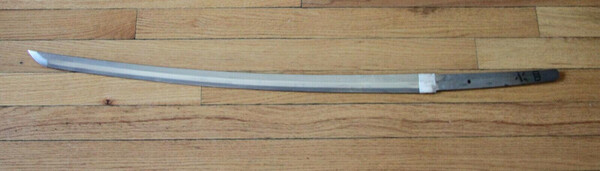
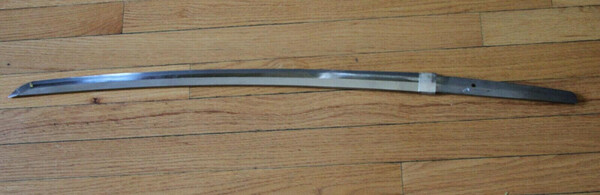
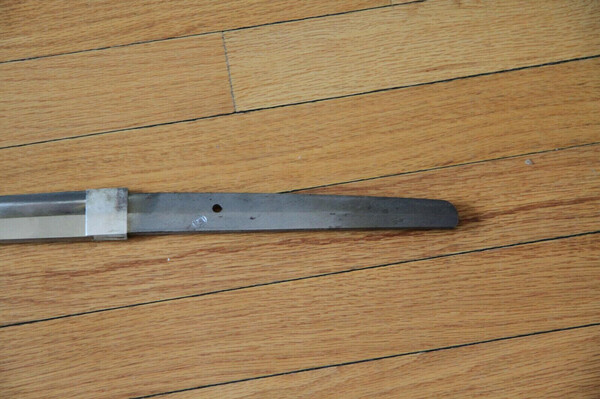
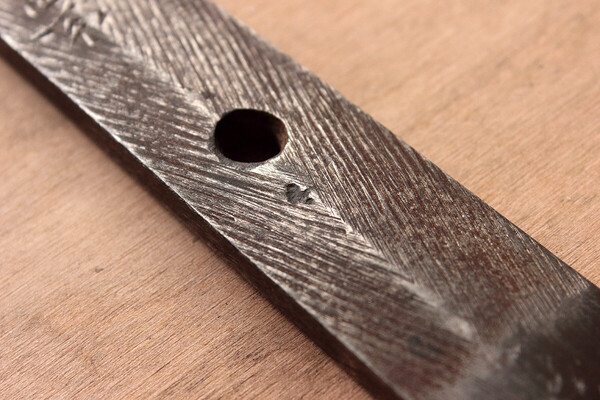
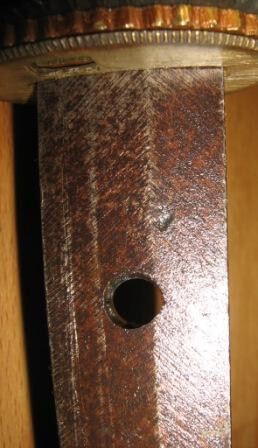
Made some search on this thing and even as one may find shortened Arisaka bayonets, this seemed to be a "standalone" thing. Yet, it was cheap and interesting (to me) so I decided to buy it anyway. Here are some photos. As you may see, it was someone's "restoration" project. And this someone put some effort into it. The reason for the blade shortening is unclear, as well as what happened to the original hilt. The facts are as follows: a new hooked quillon was crafted and brass welded to the bayonet, scabbard was shortened and again, two pieces were brass welded together. And even as "cleaning" took all the numbers from pommel, it was made quite accurately. I also shot a couple of photos of this bayonet side by side with standard Type 30 bayonet. One may notice the slight difference between arsenal stamps.


-
Can someone tell me what type this is please?
Nazar replied to Joshcamsoup's topic in Military Swords of Japan
John: I rather believe it's standard Type 30 scabbard but shortened. Look at the point where the leather mount ends. There is a visible step there. It looks like the front part of the scabbard was joined with the rear. -
Can someone tell me what type this is please?
Nazar replied to Joshcamsoup's topic in Military Swords of Japan
Let me hijack this thread for a bit. Came across this bayonet that looks like a shortened Type 30 bayonet. The scabbard seems to have a visible joint in place where it was shortened. Also, hooked quillon seems to be of untypical configuration. Maybe someone has information on such modifications and what is more interesting, on quillon. @BANGBANGSAN ?
-
I believe they may get away with more than that since it's kind of a local thing: there is a happy owner and no one to dispute the expertise. It's quite educational, though. Also, it's another demonstration of how people love shiny things:-)
-
Can someone tell me what type this is please?
Nazar replied to Joshcamsoup's topic in Military Swords of Japan
Seems to be Type 30 (Variation B) bayonet. Stamps are early version of Toyoda Jido Shokki Seisakusho (Toyoda Automatic Loom Works) -
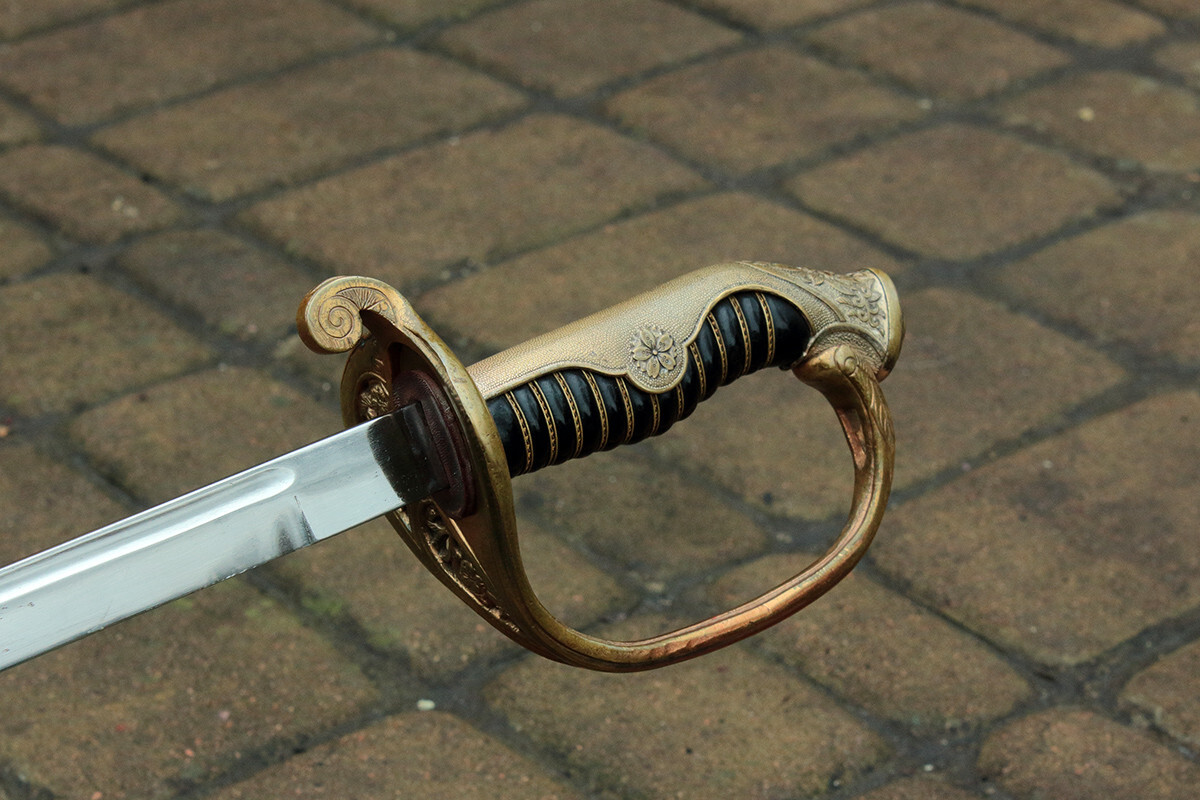
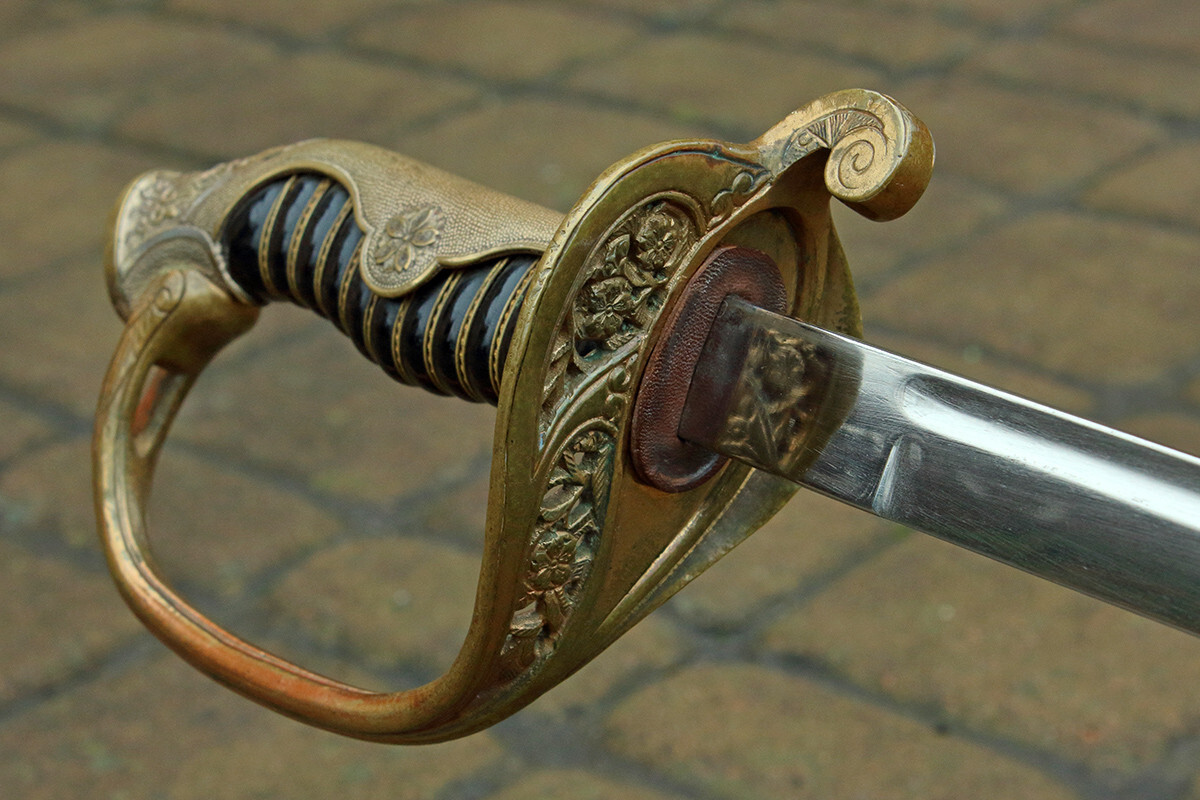
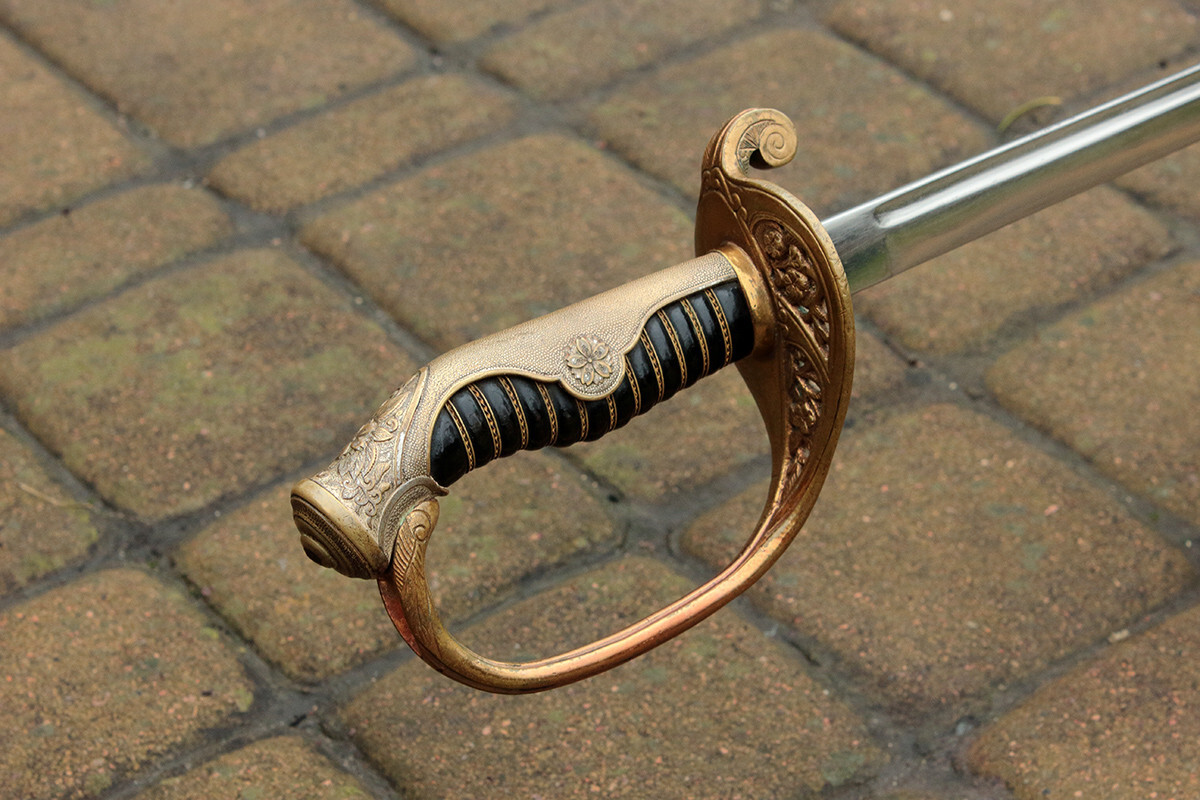
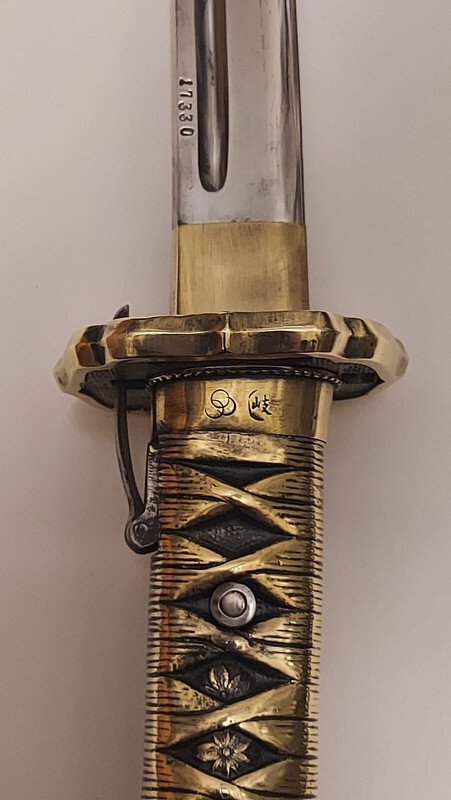
Thank you! I found this sword on the local Ukrainian website of an expert organization that provides expertise on historical edged weapons, including Japanese swords. Run through the Japanese blade section. The first thing that caught my eye is too many swords called gendaito. In the case of showato I held in my hands they first call it gendaito, then indicate that it's not traditionally made. Shin-gunto in kai-gunto saya called kai-gunto. And so on. And then I came across this shiny thing. Decided that I couldn't sleep well unless I post it here:-) And yea, those flags were indeed red flags:-)
-
I just couldn't unsee this shininess, so I have to share it. Also curious about crossed flags on habaki. Is this fake?


-
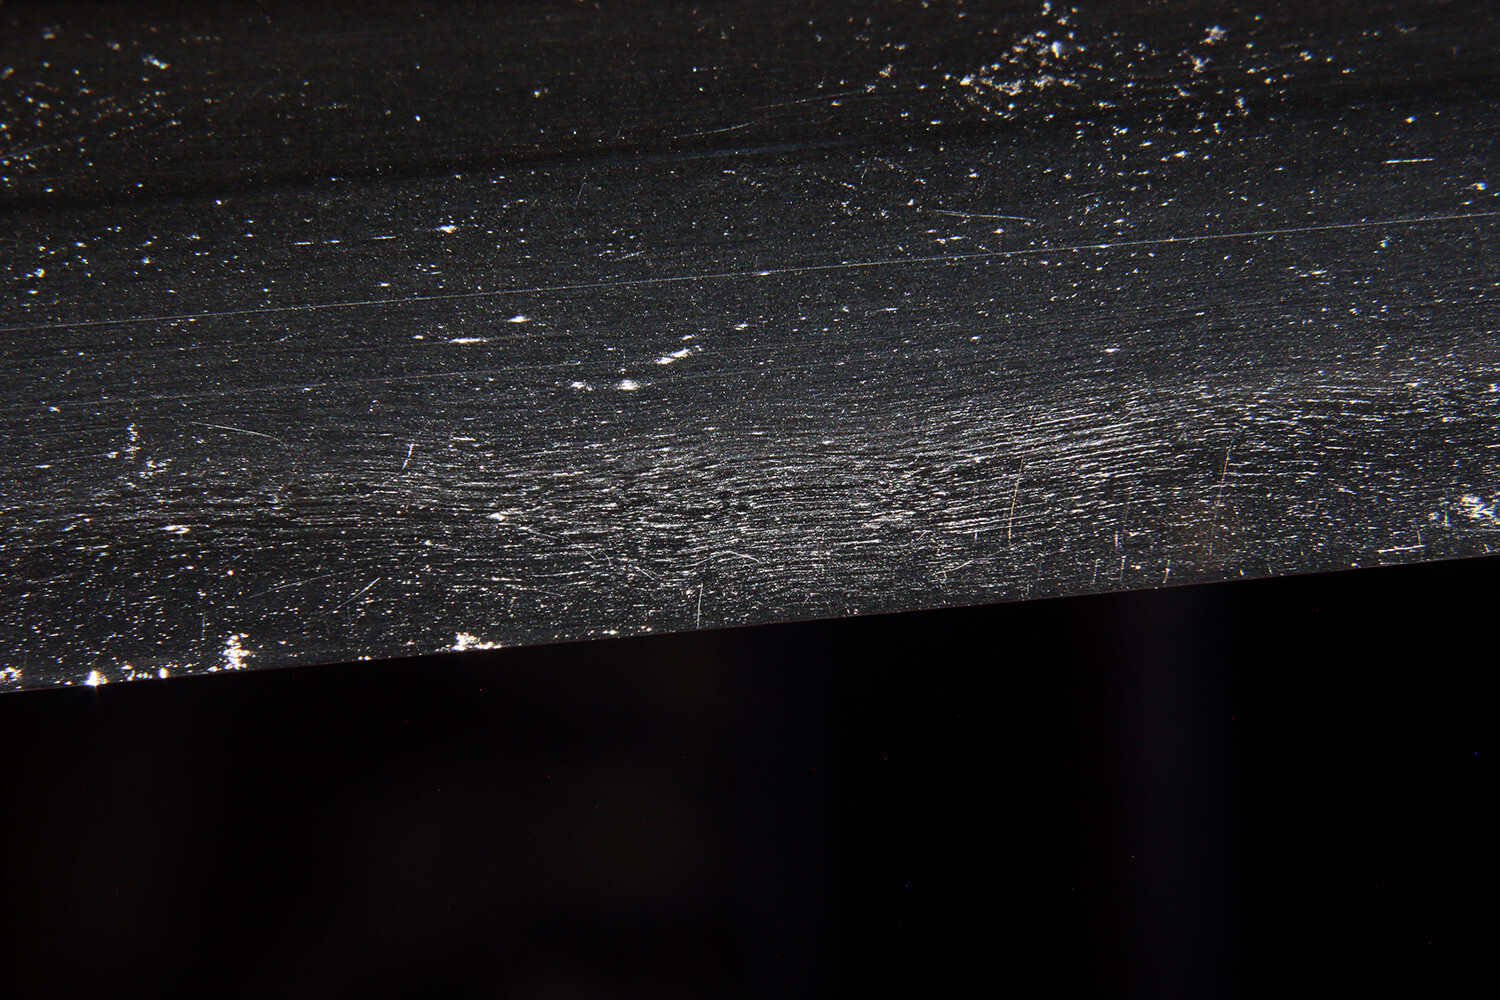
Went through my photos of sunagashi and found a picture that could be used as a clear example of fingerprints that became permanent. It doesn't look that bad in daylight, yet under the spotlight it became more prominent than shunagashi themselves. Another fingerprint (top right corner). And I like this blade with all its flaws anyway. Not only because it's the first gendaito I scored but because it gave me a lot to think about and to search for. I'll try my best so no further harm comes to it.


-
type 19 kyu gunto dress swords, i love them.
Nazar replied to lonely panet's topic in Military Swords of Japan


-
type 19 kyu gunto dress swords, i love them.
Nazar replied to lonely panet's topic in Military Swords of Japan
Have a dress sword too. Nothing fancy, though. No mon, no markings.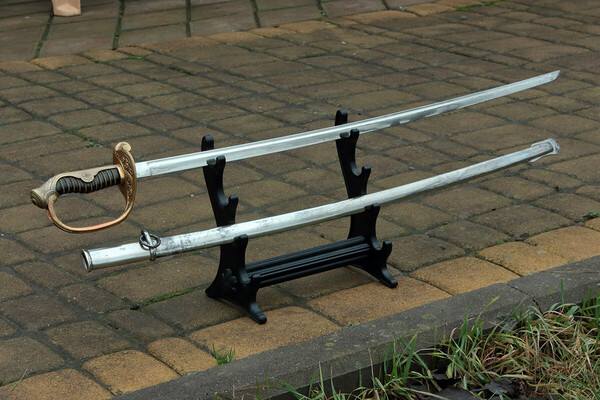


-
Indeed, great story and great luck! Congratulations, Brian!
-
Yet one


-
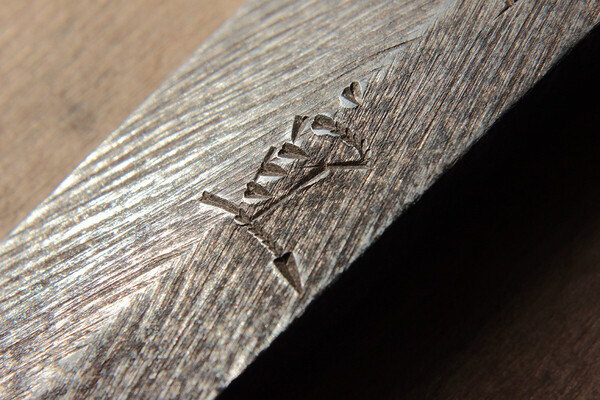
Added four more Kiyonobu swords to the list. Number 64 may be of interest as it seems to be marked with a Showa stamp.
-
Thank you! Great! I had a hope that you'll find some cases of interest there.
-
Couple of interesting facts: - What is most curious, the nakago in case #43 features a hot stamp; - There are 11 (may be 12) cases of Seki stamps; - 7 cases of TAN stamps; - There is only one case of tachi mei; - There are only two cases of Kai-gunto; - Only 9 nakago have dates on them, mostly it's 1942 and 1943; - Cases #9, #22, #26, #37 and #51 feature the yasurime that may have been filed by the same hand that filed the nakago of my sword. Case #22 also has the same taka-no-ha yasurime; - Cases #4, #30, #42 and #45 feature the signature that may have been chiseled by the same hand that signed the nakago of my sword; - Case #11 features the name Fujiwara Kiyonobu while the style of signature suggests it may be chiseled by the same person who made signatures in #4, #30, #42, #44 and #45 cases (Same V-shaped strokes in Kiyo). Case #43 with hot stamp: Here is an image of cases 4, 30, 42, 44 and 45 side by side, more or less equalized in size and aligned by Nobu (Nori) Kanji. Case #11:


-
Yesterday I more or less finished storing information on Kiyonobu swords. I have 61 swords on the list, including those three oshigata from Fuller & Gregory book and 1 from Slough. I didn't include case #2 and #8 from the Mal list (couldn't find #8). Also, I didn't double check my list for duplicates. It's hard to estimate the percentage of swords that survived to our days and the percentage of those that made it to the internet. Yet, it seems to me that the amount of his swords indicates that Nagamura Kiyonobu workshop was quite an active sword making facility. It's mostly impossible to put such a large amount of information in easily readable form, so I ended up putting it in Google Sheets, loading all available photos of each sword in a separate folder and indicating each source (if possible). So now it looks like this: https://docs.google.com/spreadsheets/d/1rz-3wH0eyylBhLYyKO0Dk1mpJz79MUGzntLsrlFPilg/edit?usp=sharing I am not sure I got all the signatures correctly, at least I had an issue with Tsukuru and Kitau Kanji. Also, I have some doubts that this information will be of value for many people, actually I wrote it down so I could analyze it. Yet, I hope it may save some trouble for those who will search for info on Kiyonobu. @Bruce Pennington, @mecox, may I ask you to take a look at this spreadsheet of mine? Would such a form of information presentation be useful?
-
Great info, Mal! Thank you! It seems that at the moment we have two cases of the small unknown stamp. Also, Kiyonobu tachi-mei does exist. Here it is: https://www.kinghouse.sg/collection-details/ww2-officer-sword-forged-by-kiyonobu At the first stage of gathering information on signatures I went ballistic and wasn't sorting information. It still would be some time till I sort it.

-
Yea Bruce, I went through your work on the stamps on Japanese swords and have seen information on punches. On the nakago of my sword this stamp was partly covered by some black dirt or substance. So indeed, at first glance it looked like some flaw. It was a double discovery: to clean it with a toothpick and realise it's not a flaw but some kind of mark and then find it's not a single case. Also, I may be wrong about it being made by a series of punches. That as well may be the personal stamp of the person that worked on this sword. Yet it doesn't present on other Kiyonobu swords except for these two. Without additional information it will remain a curious mystery.
-
Thank you, Sam! Well, it's simple :-). If one put "Fuller Gregory swordsmiths" search request into the google search bar, one soon will stumble upon this link: https://www.militaria.co.za/nmb/topic/50276-fuller-gregory-set-of-5-books/ It's great information. Yet it's strange that there is no short signature with V-strokes on the page that mentioned Kiyonobu. Either Greg from that topic on Kiyonobu sword had different editions of Fuller and Gregory books, or this signature featured somewhere but without an inscription in English (if it's possible?). If you could find some time to spare, could you please look through the books and try to find the signature that I frame in red in the picture?

-
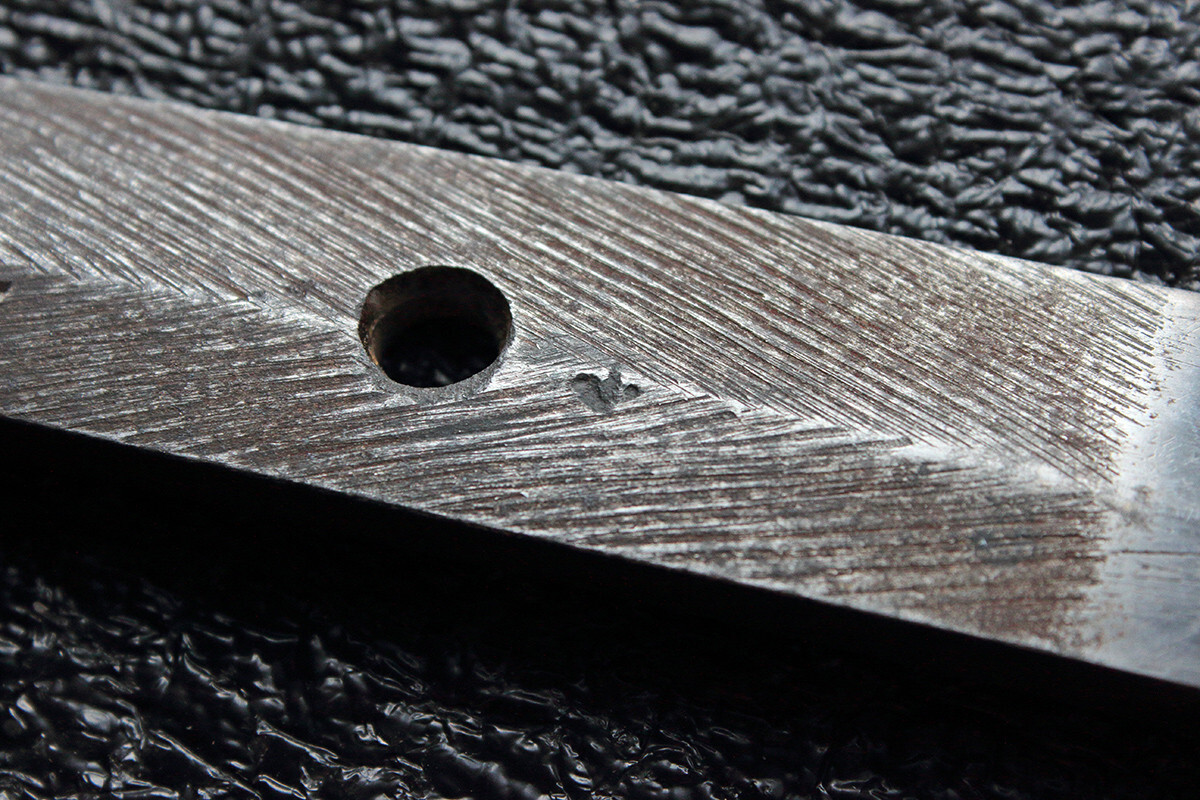
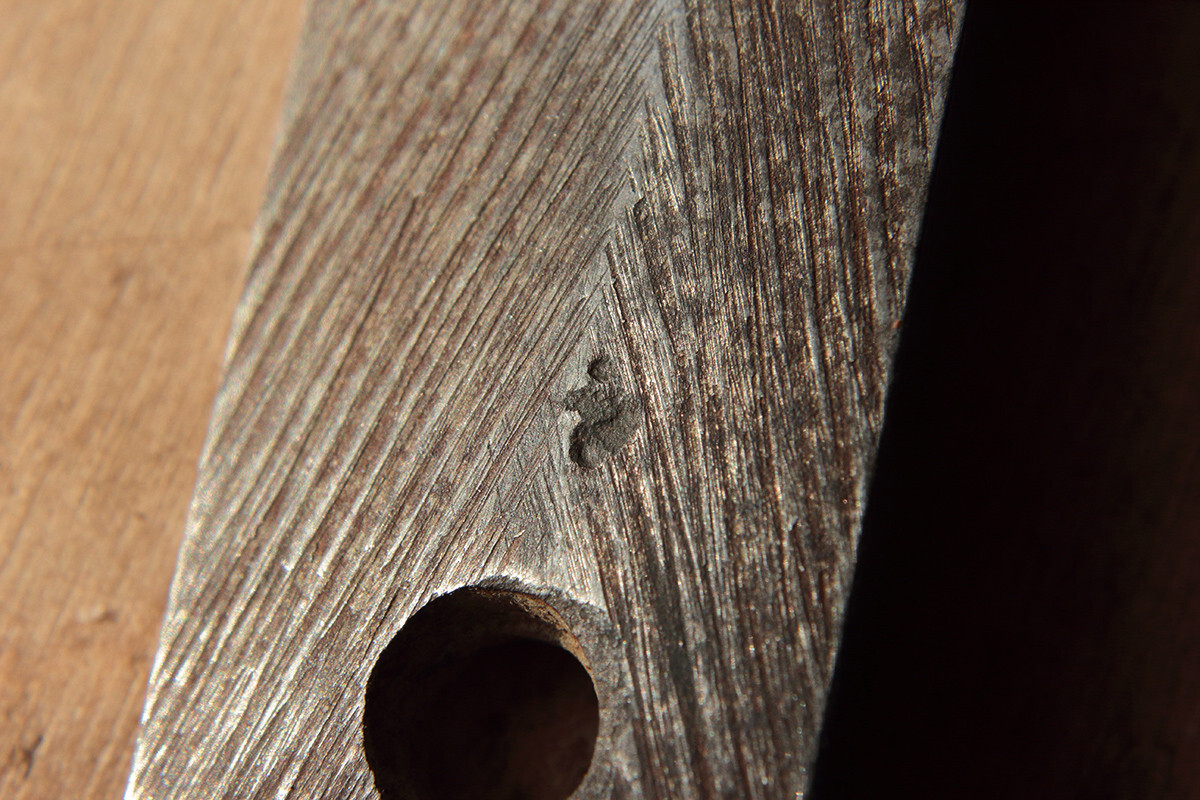
The thing about that stamp is that I believe the nakago of my sword has the very same stamp too. One may find it in the photos of nakago above. Out of all cases of Kiyonobu swords I gathered, there are only two nakago that feature this stamp. Both have short two-Kanji signatures with V-shaped strokes in Kiyo. My only guess is that this stamp is some kind of personal mark. As for how they were made. I guess that it's three punches in a row with the fourth punch slightly aside. In the case of the nakago of my sword, it seems that one of three main punches may have chipped a bit of metal. Yet, I might be wrong. Here are some close photos of the stamp.


-
And it won't come as a surprise that the very valuable information I found here on MNB, in this thread: https://www.militaria.co.za/nmb/topic/4851-man-made-or-machine-made-shin-gunto/ 1. The thread contains certain photos from the book on Japanese Swordsmith by Richard Fuller and Ron Gregory. One of the photos features Kiyonobu signature in which Kiyo Kanji has a V-shaped part. If someone has a book that contains this picture, it would be great to get a picture of the whole page. Here is the picture from that topic. I slightly improved it. @Scogg , I believe you have all three books of Fuller and Gregory on Japanese smiths. Could you help me with that picture, please? 2. The subject of the topic is the sword by Kiyonobu with short signature.The signature features V-shaped strokes in Kiyo Kanji and may be made by the same person who signed my sword. 3. The nakago of the subject sword has a curious stamp that is placed on the mei side above the mekugi ana. Here are two pictures from the topic above. Alas, the quality of pictures are low so only the general shape of that stamp is recognizable.


-
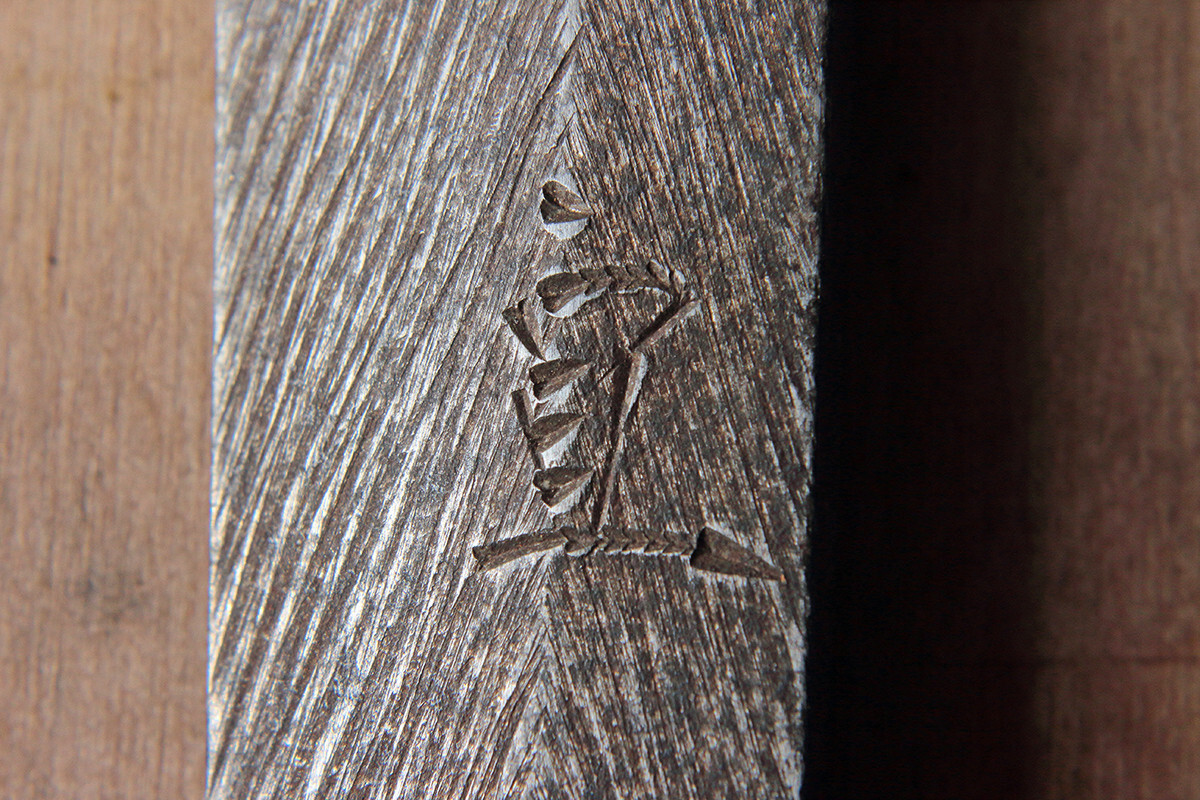
Most of the cases I gathered have no additional stamps at all. Only signatures, some long, some short. For the starter I used a couple of search engines to find as many photos of Kiyonobu swords (with nakago clearly visible) as possible. These mostly came from different auctions. I still have to analyze that information and sort pictures, because there will be some duplicates for sure. So far I only selected the signatures that are likely made by the same hand as a signature on the nakago of my sword. The most easily spotted feature of this signature is V-shaped stokes in the 清 "Kiyo" Kanji. Most Kiyonobu signatures do not feature these strokes. Including a well known example of a long signature (with a Tan stamp) in John Slough book. Here are some closer photos of Kanji:


-
Thank you for your kind words, Bruce! It is indeed a great hobby and I enjoy every aspect of it, from uchikoing to searching for information. I am still working on the signature of Kiyonobu. As you well know, there are some variations of it. You have some in your files. So far I managed to collect around 20 Kiyonobu signatures. Some with Seki, some with Tan stamps. My greatest interest is in signatures made by the same hand that signed my sword. So far, I believe, I have 4 such cases (including my sword) and one interesting "anomaly". Yet I have to finish my research before I post information.
-
It's very hard to learn things only from pictures, without real traditionally forged blades at hand. One starts to doubt and double check everything. It was very important to me to get confirmation that what I see is what I think it is. Therefore, I reached Jean ROKUJURO here with a question and he kindly responded. Thanks to him once more for his answer! He confirmed that these are indeed sunagashi. I was very glad to receive that answer. For one thing, it makes me happy that I not only learned something but also was able to apply this small knowledge in practice. For another, it does mean that this sword is likely gendaito. And because it's my first gendaito and I found this out on my own it makes this sword kind of a treasure for me, even as for many of you guys it's just another war time blade made by a not very renowned smith. Also, as Jean noticed in his message, the general condition of the blade is an issue. Still I am very glad that this sword is in my hands now. Buffing caused a lot of damage. Yet, I suspect that long before the buffing blade was polished and the polisher didn't do his best. The main indications of this are as follows: the line of Koshinogi is more straight on the mei side of the blade while it's more curvy on another. There is also a spot on the blade close to ha-machi (on the mei side ) that looks strange. In my inexperienced opinion it looks like the polisher didn't get the real line of hamon and tried to create a false hamon line. These occurrences couldn't be explained by buffing only. Later on I'll shoot some photos of these areas. At the moment I am away from my swords and will be away for some weeks. Alas in cases of even gendai blades made by not very renown smiths like Nagamura Kiyonobu the polishing might be unwise. Also finding a polisher here in Ukraine might be an issue. So for the time being I will go only as far as Uchiko could get me. And even with it I'll be very cautious.